Linux - Web 服务
目录
Apache
官网是 http://httpd.apache.org ,还可通过 http://www.netdcraft.com 来查看server占有量。
rz 命令可用来上传文件。
安装apache首先得先安装它的依赖包,这些安装包官网上都有下载链接。
- apr
- apr-util
安装 Apache 得先安装依赖软件包 apr/apr-util,你在安装 apr-util 时要注意 apr 跟 apr-util 是依赖关系,所以需要加上 --with-apr=/usr/local/apr。
上面提到的依赖是手动编译安装需要注意的问题,不想这么麻烦也可使用 yum 来解决 apache 依赖包,为了练习安装以下操作还是手动进行。
yum -y install openssl-devel pcre-devel zlib-devel libtool expat expat-devel安装 apr(Apache Portable Runtime)
tar xvzf apr-1.5.2.tar.gz -C /usr/src

cd /usr/src/apr-1.5.2

./configure --prefix=/usr/local/apr

make

make install
安装 apr-util
tar xvzf apr-util-1.5.4.tar.gz -C /usr/src

cd /usr/src/apr-util-1.5.4

./configure --prefix=/usr/local/apr-util --with-apr=/usr/local/apr

make

make install
安装 apache2.4.27
tar xvzf httpd-2.4.27.tar.gz -C /usr/src

cp -rf /usr/src/apr-1.5.2/ /usr/src/httpd-2.4.27/srclib/apr

cp -rf /usr/src/apr-util-1.5.4/ /usr/src/httpd-2.4.27/srclib/apr-util

cd /usr/src/httpd-2.4.27

./configure --prefix=/usr/local/httpd --enable-so --enable-ssl --enable-cgi --enable-rewrite --enable-deflate --with-zlib --with-pcre --with-apr=/usr/local/apr --with-apr-util=/usr/local/apr-util --enable-modules=most --enable-mpms-shared=all --with-included-apr -enable-proxy --enable-proxy-fcgi

make

make install
优化执行路径
ln -s /usr/local/httpd/bin/* /usr/bin/添加 httpd 系统服务。
[root@www ~]# cp /usr/local/httpd/bin/apachectl /etc/init.d/httpd
[root@www ~]# vi /etc/init.d/httpd

# !/bin/bash
# chkconfig: 35 85 15
# description: Startup script for the Apache HTTP Server
.....
注册服务。
[root@www ~]# chkconfig --add httpd
[root@www ~]# chkconfig --list httpd
配置文件
默认配置文件位于 /etc/httpd/conf/httpd.conf。
启用 conf.d 下以 .conf 的文件只需启动下面语句。
IncludeOptional conf.d/*.conf关键设置
port 80 #默认设为80
DirectoryIndex index.html #默认值是index.html

#来设置访问出错时返回哪些页面。
ErrorDocument 500 "The server made a boo boo."
ErrorDocument 404 /missing.html
ErrorDocument 404 "/cgi-bin/missing_handler.pl"
ErrorDocument 402 http://www.example.com/subscription_info.html
如果需要配置虚拟主机只需删除注释。
# Virtual hosts
#Include conf/extra/httpd-vhosts.conf
接着编辑 conf/extra/httpd-vhosts.conf
<VirtualHost *:80>
    DocumentRoot /var/www/cn #指定网站目录
    ServerName blog.farmsec.cn #设置FQDN
    DirectoryIndex #在这里可以设置默认读取的首页,不设置它也不会默认读取httpd.conf中的设置。
    ErrorLog /var/log/httpd/hosts_error.log #定义错误日志位置
    CustomLog /var/log/httpd/hosts_access.log common #定义访问日志位置
</VirtualHost>
<Directory '/var/www/cn'>
    AllowOverride None #要不要从.htaccess中读取规则,.htaccess有些危险,一般禁止。
    Require all granted #设置所有人都可以访问cn中内容
    Options FollowSymLinks #配置Apache不显示目录列表,当目录中找不到定义的首页文件index.html就会显示当前网站目录列表。
</Directory>
当配置虚拟主机后,访问一个不存在的 FQDN,Apache 虚拟主机会将第一个虚拟主机配置的内容返回,不会返回默认 DocumentRoot 内容。
Nginx
Nginx 可以采用两种方式安装,一个自动下载,另一个手动编译安装。
先看使用 yum 自动安装。
yum 源的方式安装稳定版。
在 /etc/yum.repos.d/ 创建 nginx.repo 内容如下。
[nginx-stable]
name=nginx stable repo
baseurl=http://nginx.org/packages/centos/$releasever/$basearch/
gpgcheck=1
enabled=1
gpgkey=https://nginx.org/keys/nginx_signing.key
直接 yum -y install nginx。
接着我们学习手动编译安装,相对于 yum 来说手动安装等同于 Windows 安装软件的高级选项,可以自主选择某些组件要不要安装上,对于一些用不到的可以选择性不安装。
先到官网下载 Nginx Mainline version 包。
在实际工作中一般都是远程连接到目标服务器,直接接触服务器本体的机会不多,这里使用 SSH 进行连接。

将下载好的 Nginx 源码复制到服务器上,至于你使用浏览器下载到本机还是 Wget 等工具下载到服务器,都可。
为了在服务器上安装软件,得先将包复制到服务器上。下面这条命令意思是将当前目录下 Nginx 软件包复制到 192.168.4.105 主机 /usr/local/src 目录下,在 IP 地址前面还加了 root,这个代表用 root 账户去登录。
root@gbb:~/下载# scp nginx-1.16.0.tar.gz root@192.168.4.105:/usr/local/src
root@192.168.4.105's password:
nginx-1.16.0.tar.gz                          100% 1008KB  56.9MB/s   00:00
Tips:
如果你想知道
scp是个什么功能的命令,可以简单用whatis scp查看(其他命令也可以这样查看哦),更复杂的介绍和使用方法请使用 man 手册——man 它是个命令只是 manual 的缩写所以我这里写手册,使用方法 Google 多如牛毛,去搜寻吧)。
开始编译?没错就要开始了,前面我们已经把包 Copy 到服务器,现在我们要把这个压缩包解压缩,取出来源码编译它。
[root@localhost ~]# cd /usr/local/src
[root@localhost src]# ls
nginx-1.16.0.tar.gz
[root@localhost src]# tar xvfz nginx-1.16.0.tar.gz
解压完成后会在当前目录下多出一个目录。
[root@localhost src]# ls
nginx-1.16.0  nginx-1.16.0.tar.gz
在 WIndows 安装软件都是下一步鼠标点点点,有时候你想安装到其他盘符,会自定义安装目录对吧?在这里也可以选择我们要操作的内容,比如自定义软件安装目录、配置文件目录、扩展功能(一般叫标准或扩展模块)等,你可以 ./configure --help 来看有哪些内容可以自定义。
这里我写了程序安装目录、配置文件目录、错误日志目录、访问日志目录和一个 gunzip 压缩模块。
[root@localhost src]# cd nginx-1.16.0
[root@localhost nginx-1.16.0]# ./configure --prefix=/usr/local/nginx --conf-path=/etc/nginx/nginx.conf --error-log-path=/var/log/nginx/error.log --http-log-path=/var/log/nginx/access.log   --with-http_gunzip_module
如果执行上面配置时显示错误,这大概率是因为系统没有编译环境(但还是要具体看错误信息来解决)把对应软件包安上就行。
[root@localhost nginx-1.16.0]# # 更新系统所有软件并安装依赖包,顺手把一些网络工具和VIM文本编辑器安上。
[root@localhost nginx-1.16.0]# yum makecache && yum-y update && yum -y install gcc pcre-devel zlib-devel net-tools vim
重复运行。
./configure --prefix=/usr/local/nginx --conf-path=/etc/nginx/nginx.conf --error-log-path=/var/log/nginx/error.log --http-log-path=/var/log/nginx/access.log --with-http_gunzip_module直至没有错误,就可以使用下面命令进行安装。
[root@localhost nginx-1.16.0]# make && make install到我们自定义的目录中看一下有没生成二进制程序。
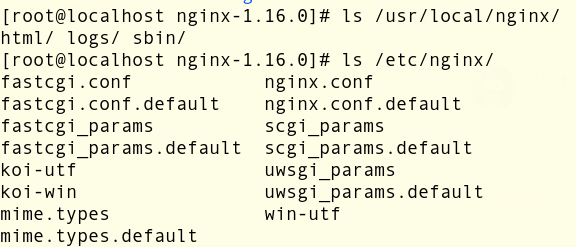
软件安装完了做以下配置收尾,编译安装不像 Windows 自动设置注册表、环境变量等信息,我们需要手动进行。
将 nginx 命令加到坏境变量中。
[root@localhost ~]# echo PATH=$PATH:/usr/local/nginx/sbin > /etc/profile.d/nginx.sh
[root@localhost ~]# source /etc/profile.d/nginx.sh
下载 systemd 自启脚本,把下面路径填上程序的绝对路径,这样使用重启服务才会正确找到程序。
[Unit]
Description=The NGINX HTTP and reverse proxy server
After=syslog.target network.target remote-fs.target nss-lookup.target

[Service]
Type=forking
ExecStartPre=/usr/local/nginx/sbin/nginx -t
ExecStart=/usr/local/nginx/sbin/nginx
ExecReload=/usr/local/nginx/sbin/nginx -s reload
ExecStop=/bin/kill -s QUIT $MAINPID
PrivateTmp=true

[Install]
WantedBy=multi-user.target
自启动脚本修改好了,将它放入服务对应的目录 /etc/systemd/system/ 里,接着设置开机自启,并启动 Nginx 服务,启动成功就到浏览器输入服务器 IP 访问吧。
[root@localhost ~]# systemctl enable nginx
Created symlink from /etc/systemd/system/multi-user.target.wants/nginx.service to /usr/lib/systemd/system/nginx.service.
[root@localhost ~]# systemctl start nginx
咦,访问不了?不这不是你的错,要做的很简单,把那可恶的防火墙——firewalld、selinux 关掉重启机器就可以了。
但不推荐这种方法,更职业的做法是开放 Web 服务对应端口而不是彻底关闭,这只是在不了解防火墙原理时才直接关掉它。
[root@localhost ~]# sed -i 's!enforcing!disabled!g' /etc/selinux/config
[root@localhost ~]# systemctl disable firewalld
[root@localhost ~]# systemctl stop firewalld
Tips:
cd这条命令是用来切换目录的,从当前位置切换到其他地方。- 而
ls则是用列表的样子把当前目录下的内容显示出来。tar是一个用来打包的工具,将所有文件打成一个包,它和 Windows 压缩工具不一样,并不减小体积(但它有压缩选项)。yum是 RedHat 系列的软件包管理工具,类似手机 appstore。sed用来处理文本非常好用,比如可以替换文本在文本前头加上文字。systemctl常用来控制服务的启动关闭等等,在 CentOS7 之前的版本是用service。
nginx 命令一些选项。
Options:
  -?,-h         : this help
  -v            : show version and exit
  -V            : show version and configure options then exit
  -t            : test configuration and exit
  -T            : test configuration, dump it and exit
  -q            : suppress non-error messages during configuration testing
  -s signal     : send signal to a master process: stop, quit, reopen, reload
  -p prefix     : set prefix path (default: /etc/nginx/)
  -c filename   : set configuration file (default: /etc/nginx/nginx.conf)
  -g directives : set global directives out of configuration file
配置文件
主要有两个:
- nginx.conf,Ngxin 主要配置文件
- fastcgi,用于连接 PHP
nginx.conf
user  nginx;
worker_processes  1;

error_log  /var/log/nginx/error.log warn;
pid        /var/run/nginx.pid;


events {
    worker_connections  1024;
}


http {
    include       /etc/nginx/mime.types;
    default_type  application/octet-stream;

    log_format  main  '$remote_addr - $remote_user [$time_local] "$request" '
                      '$status $body_bytes_sent "$http_referer" '
                      '"$http_user_agent" "$http_x_forwarded_for"';

    access_log  /var/log/nginx/access.log  main;

    sendfile        on;
    #tcp_nopush     on;

    keepalive_timeout  65;

    #gzip  on;

    include /etc/nginx/conf.d/*.conf;
}
Nginx 搭建 PHP 环境
设置 /etc/php-fpm.conf 配置文件中用户名与 Nginx 配置文件一致,避免权限问题。
设置 Nginx 配置文件将 .php 后缀的请求转发到 fastcgi。
server {
    listen 80;
    root 站点目录绝对路径;
    index index.php index.html; #配置默认首页
    access_log  logs/host.access.log  main; #配置你站点访问日志,注意更改日志名称。

    location ~ \.php$ {
        fastcgi_pass   127.0.0.1:9000;
        fastcgi_index  index.php;
        fastcgi_param  SCRIPT_FILENAME  $document_root$fastcgi_script_name;
        include        fastcgi_params;
    }
}
Nginx 搭建 Java 环境(未解决)
参考资料:http://tomcat.apache.org/tomcat-8.5-doc/appdev/installation.html
配置反向代理和负载均衡
所有请求都先经过反向代理,再由它将请求转发给内部服务器。
另外负载均衡在Nginx中是软件负载(LVS负载均衡),还有硬件设备支持负载均衡(F5)。
关于硬件/软件负载区别可参考这边文章的介绍:浅谈Nginx负载均衡与F5的区别。
http {
    upstream name { #这里的name是可自定义的。
        server domain; #在内网设有dns服务器指向本地域名(我觉得写域名更优雅)。
        server ip_address fail_timeout=10s max_fails=2; #timeout不填这个选项也是10s,fails最多尝试几次,到达限制后就判定这台服务器挂了,下次请求不转给它。
        server ip_address:port weight=1; #weight是权重,越高拿到的任务越多(称作轮询)
        server ip_address weight=1; #这两个IP多个用户访问到会随机访问到其中一个地址它们页面内容是一致的,至于怎么把内容发布上去,这事儿运维管(代码托管平台)。
        ip_hash; #每个用户访问到一个地址后用hash计算用户ip地址是否一致,一致的话会一直把它交给这个地址进行访问,是为了避免session不存在用户重新认证的问题。
        least_conn; #看那个服务器连接数最少就把请求发送给它。
    }
    server{ #如果有多个server
            listen [ip_address:]80;
            server_name domain; #用户要访问的域名(这个域名是访问反向代理哦),用于匹配http_request中host字段,一直就交给这台server去处理请求,匹配不到就交给第一台server去处理,要是某台server设置default_server字段就交指给写这个字段的server处理。
            access_log  /var/log/nginx/yourdomain_access.log; #设置访问日志路径
            location / {
                proxy_pass http://name; #去调用上面定义的name配置,将请求转发给定义的server。
                proxy_read_timeout 300; #代理服务器300s没读取到内容就关闭连接,默认值60s。
                proxy_connect_timeout 300; #300s内没建立连接就显示超时,官方说一般不会超过75s,默认值60s。
                proxy_redirect     off;
                proxy_set_header   X-Forwarded-Proto $scheme; #这条往下全部是设置HttpRequestHeaders中的字段
                proxy_set_header   Host              $http_host;
                proxy_set_header   Host              $host; #传入一个不存在的headers字段就把值设置成ServerName字段的值(可能是防止攻击)。
                proxy_set_header   X-Real-IP         $remote_addr;
            }
        }
}
配置虚拟主机
server {
    servername hostname.domain;
    access_log  /var/log/nginx/host.access.log  main;
    location / {
        root   站点绝对路径;
        index  index.html index.htm;
    }
}
server {
    servername hostname.domain;
    access_log  /var/log/nginx/host.access.log  main;
    location / {
        root   站点绝对路径;
        index  index.html index.htm;
    }
}
配置高可用反向代理
Keepalived 配置文件
vrrp_instance VI_1 { #VI_1名字是可选的
    state MASTER #主力机器设为MASTER,具体谁是master要看它们那个priority值最大。
    interface eth0 #将virtual_ip绑定到本机那张网卡
    virtual_router_id 51 #master和backup需要一致,0-255主要是为了区分几台反代是不是在同一个集群内。
    priority 100 #谁的值越大谁就是master
    advert_int 1 #不填默认0.92秒一次
    authentication {
        auth_type PASS
        auth_pass 1111
    }
    virtual_ipaddress {
        172.16.12.100/16 #定义对外提供访问的vip,主从一致,地址要和本地网卡在同一网段。
    }
}
Keepalive 只会判断本身服务是否挂了,并不关心 Ngxin 或其他 Web 服务器运行状况。只有主用反代 Keepalive 挂了才会切换到备用反代。
这种情况用脚本检测 nginx 运行状态 stop 就把 Keepalive 也停掉,另几种方法下面贴出。(参考资料贴下面了)。
1.使用脚本检测
#!/bin/bash
# 简介:如果进程中没有nginx则将keepalived进程停掉
A=`ps -C nginx | wc -l`  ## 查看是否有nginx进程把值赋给变量A
if [ $A -eq 1 ]; then  ## 如果没有进程值是为1(显示标题为1行)
    systemctl stop keepalived  ## 则结束 keepalived 进程
fi
完整示例如下所述
vrrp_script check_nginx {
    ##监控脚本路径
    script "/etc/keepalived/check_nginx_dead.sh" #执行脚本
    interval 1 #每秒检查一次
    weight 2 #权重
}
vrrp_instance VI_1 {
    ...
    track_script { #把要监控的脚本写在里面,不然报错。
        check_nginx
    }
}
2.利用 killall 检测 Nginx 服务状态
这也是最佳方案。
yum -y install psmisc #安装killallKeepalive 配置文件中加上
vrrp_script check_nginx {
    script "killall -0 nginx" #返回结果是0就代表nginx存在,不存在就执行降权。
    interval 2 #每2秒允许上面code一次
    weight -5  #将权重降低,备用反代将成为master。
}

vrrp_instance VI_1 {
    ...
    track_script { #这里调用前面脚本
        check_nginx
    }
}
安全配置
Nginx
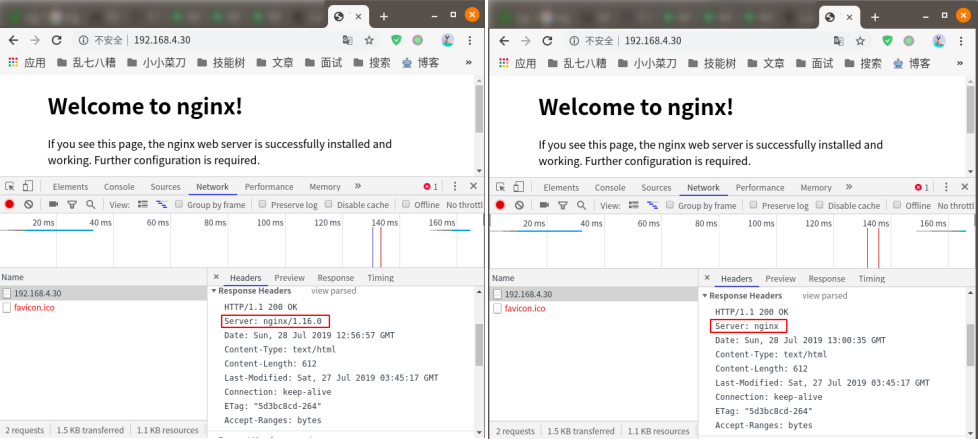
1.关闭版本号
配置文件中添加 server_tokens off;,可通过版本号来找具体版本漏洞。
2.防止点击劫持
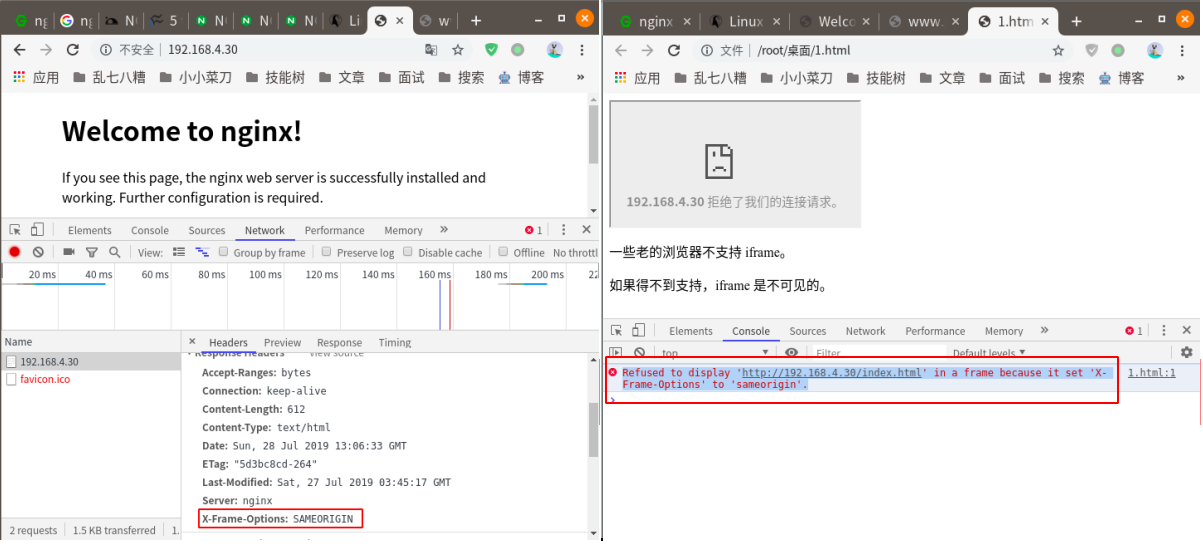
添加 X-Frame-Options 字段防止当前域名的站点被别其他站点用 <iframe> 嵌入进去,假设 CSGO 官网活动页面存在 HTML 注入,你现在注入了一个 ifarme 标签,这个标签链接的是微博个人页面,当你点击活动页面的领取礼包的按钮时就相当点击微博的关注,这就是点击劫持,解决方法是在配置文件中添加 add_header X-Frame-Options "SAMEORIGIN";,SAMEORIGIN 是只允许被当前域名下的站点嵌入 <iframe>。
3.限制请求方法
大多数站点只用到 GET 和 POST,连 HEAD 这种方法也用不上,启用还可能被扫描工具利用来探测资源(比如御剑)。
if ($request_method !~ ^(GET|POST)$ ) {
    return 403;
}
在测试过程中发现 Nginx 默认也不支持 OPTIONS 方法。当你修改过后使用禁止的请求方法就返回 403 ,说明设置成功。
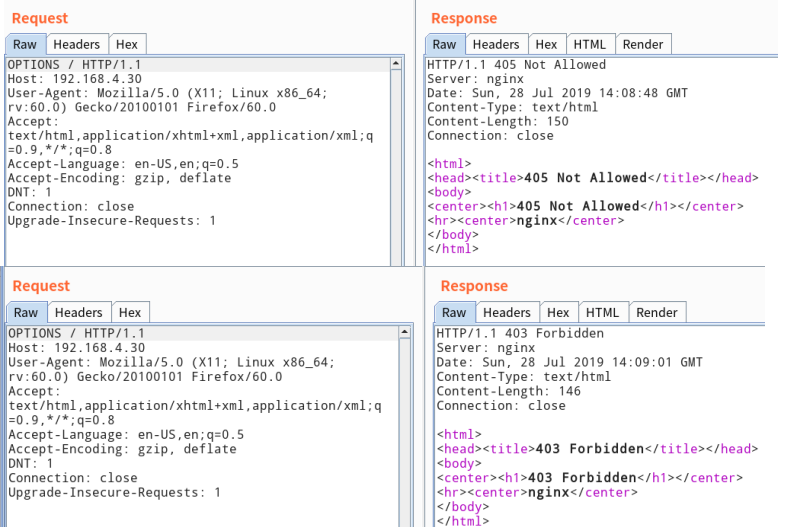
不过这个事儿一般是应用来做限制,没必要从服务器配置。
4.限制访问频率
这种限制仅仅能防止别人开扫描器,只能挡住哪些没耐心的。这里使用 一个叫 limit_req_zone 的模块是基于漏斗算法实现的。它的配置介绍如下。
rate=50r/s 限制每秒最多接受 50 个请求,burst=5 最多超出 5 个请求,也就是说这个漏斗现在能放 55 个请求,每秒就可以立即处理 55 个请求,超出 55 个返回状态码 403。
其实设置并发应该调查清楚(我打开京东首页一秒就发了 53 个请求),设想如果是一个站点明天要做活动,你给限制了并发,那大部分人都被挡在外面恐怕要被惩罚。
http {
    #...
    limit_req_zone $binary_remote_addr zone=one:10m rate=50r/s; # 限制每秒最多接受50个请求
    server {
        limit_req zone=one burst=5 nodelay; # 限制并发5
        limit_req_status 403;
        #limit_req zone=one; # 不限制并发
        location /search/ {
            ...
        }
    }
}
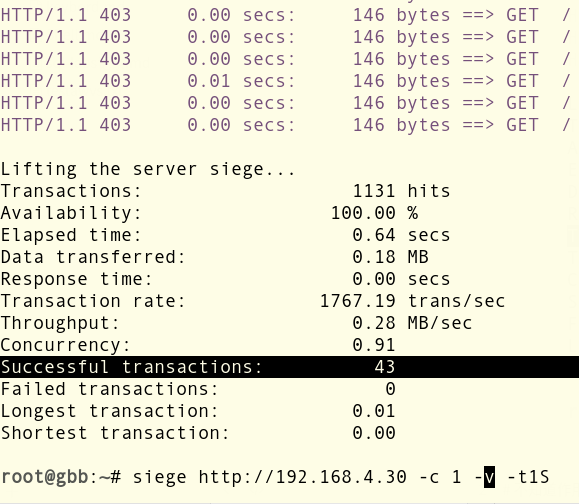
使用 siege 压测工具,传输了 1131 个请求,成功的只有 43 个,表示限制成功。
5.及时升级 Nginx 版本——为了应用稳定运行,没人敢动。
6.启用 ModeSecurity 等开源 WAF。
PHP
主要通过 php.ini 配置文件来配置 PHP。
1.不显示 PHP 版本号
避免通过版本号发现 PHP 存在安全问题。
expose_php = Off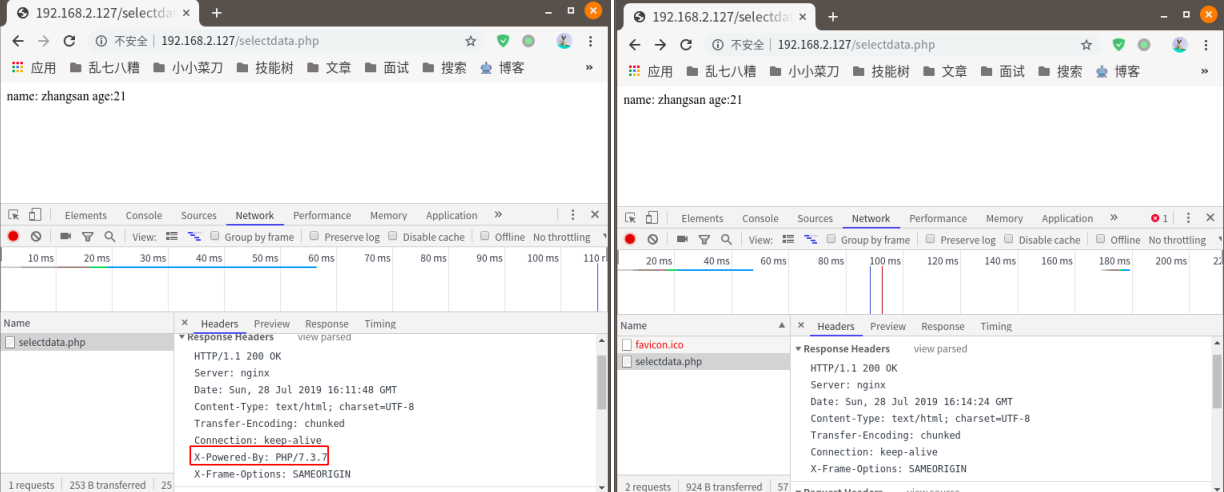
2.不显示错误信息
在生产环境中不应打开这个选项,当错误出现时会泄露你站点路径或是 MySQL 报错信息,最佳做法是把错误信息记录到文件回传到日志平台分析。
display_errors = Off #关闭错误显示
log_errors = On  # 开启错误日志记录
error_log = /var/log/php/php_scripts_error.log # 选择日志路径
在脚本中添加 $file=fopen("welcome.txt","r"); 让 PHP 产生错误。
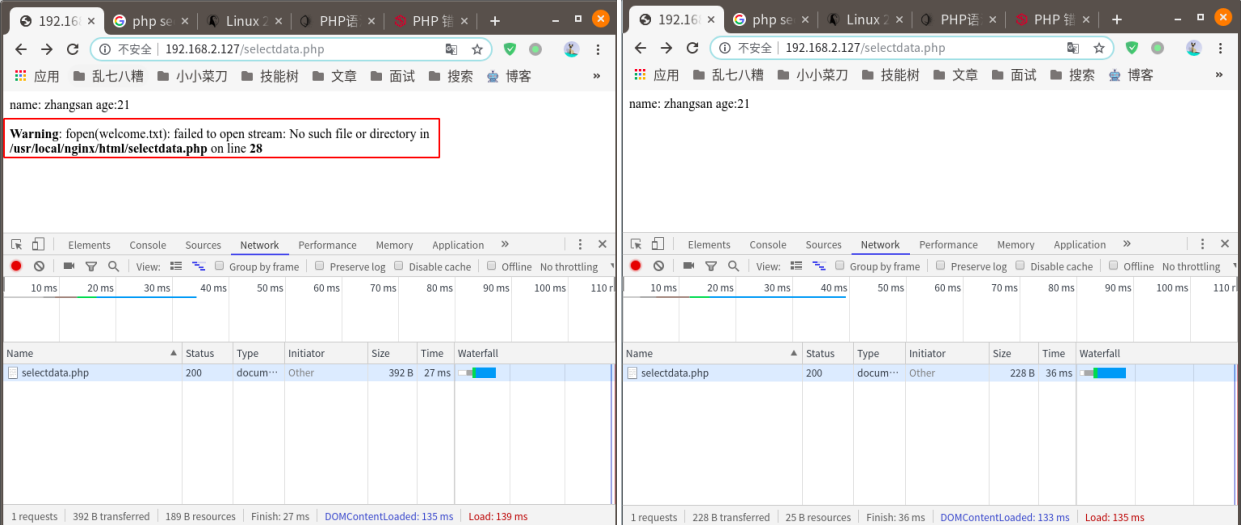
这活儿最好应用和 PHP 都一起处理异常,将异常写入日志,供研发分析。
3.禁用危险函数
这个要你熟悉 PHP 才行,需要根据实际业务场景去判定哪些需要禁止。
disable_functions = function_name4.防止目录遍历(画地为牢)
当脚本访问 /usr/local/ngoinx/html 这个目录外的文件,直接拒绝可防止本地文件包含。
open_basedir = /usr/local/nginx/html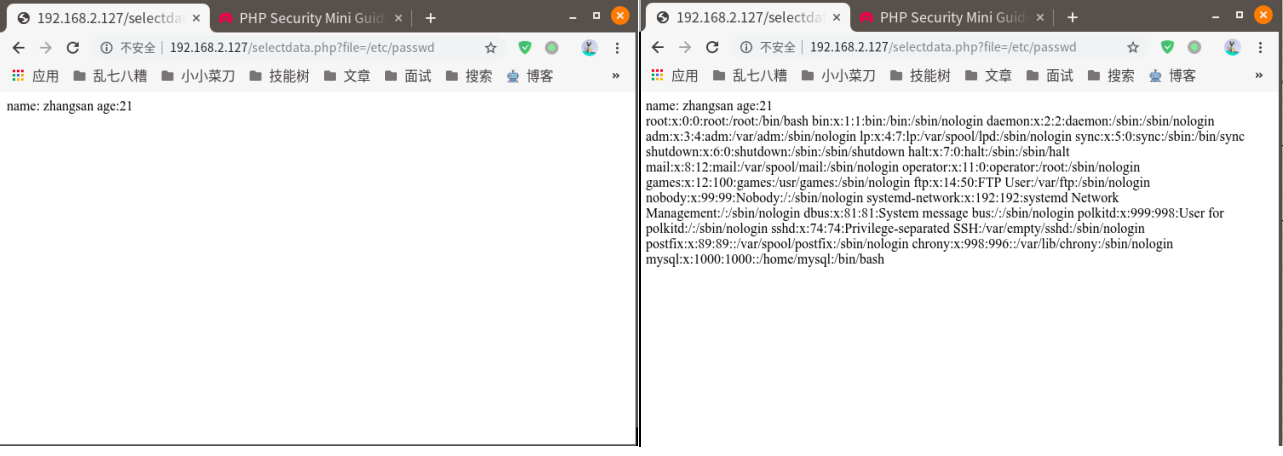
5.防止远程文件包含
php.ini中allow_url_fopen和allow_url_include的设置。禁止包含远程文件。
allow_url_include = Off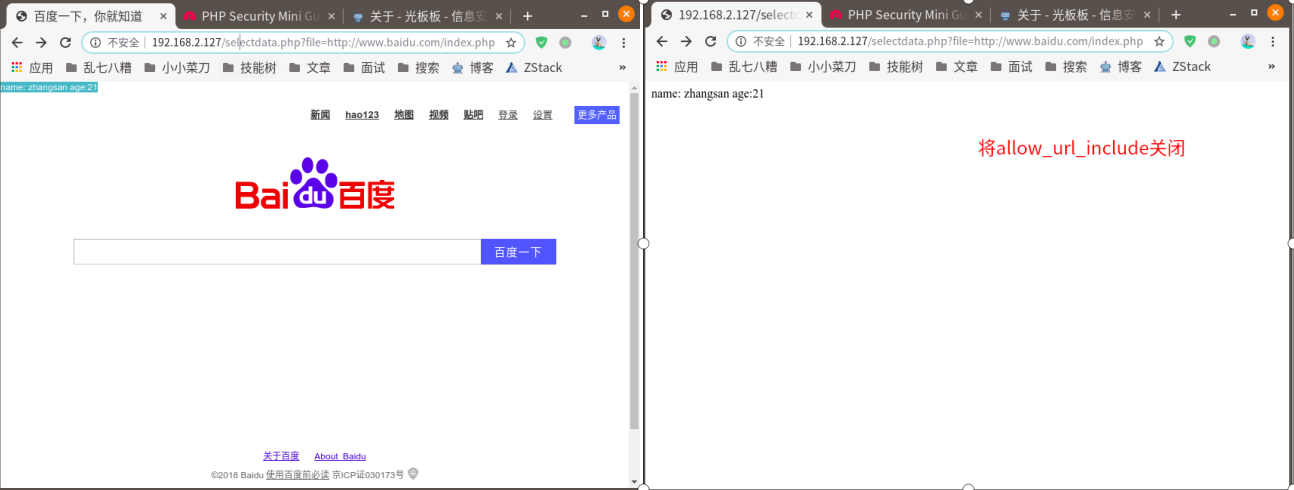
Tips:
记笔记是有必要的,踩到坑后你成长了这是好事,从另一个角度来说下次遇到坑你能确保自己能记住大部分细节吗?事实是人脑记不住那么多东西的,有人说我记得住上次看网上有篇文章解决过这个问题,好,你能保证那篇文章明天不会消失吗?我个人理解记笔记作用就是避免下次再踩坑重复性劳动。
参考链接
- Linux中Apache(httpd)安装、配置、加为服务
- Module ngx_http_upstream_module,upstream模块
- Module ngx_http_proxy_module,proxy模块
- Nginx如何处理一个请求,server块配置
- Keepalived & LVS 搭建高可用的Web服务,Keepalived+LVS快速入门
- Nginx反向代理,负载均衡,redis session共享,keepalived高可用,图画的较为细致
- 【大型网站技术实践】初级篇:借助LVS+Keepalived实现负载均衡
- Keepalived详解(四),怎么利用killall特性切换Keepalived主从
最近更新:
发布时间:
