Java - Spring Boot
Spring Boot 3.X 版本,要求 Java 最低是 17 的版本,这在官网已有说明 https://docs.spring.io/spring-boot/system-requirements.html。
使用 Spring Boot 真的有生产力提升,最核心的体验在于减少配置工作量。
以前写 Spring MVC 的时候要手动引入一堆依赖,在 Spring Boot 中官方已经为这些常见依赖都分别打了包,只要引入少量依赖即可使用,官方称呼这些依赖叫场景启动器 starter。就算减少了依赖引入,但是还是要配置啊,这点 Spring Boot 也有考虑到,官方与使用者有一个默契 “约定大于配置”,很多配置在没有主动配置的情况下都有默认值,比如前端控制器,视图解析器自动创建和配置,自动扫描主程序当前包和其所有子包。
目录
1 搭建项目
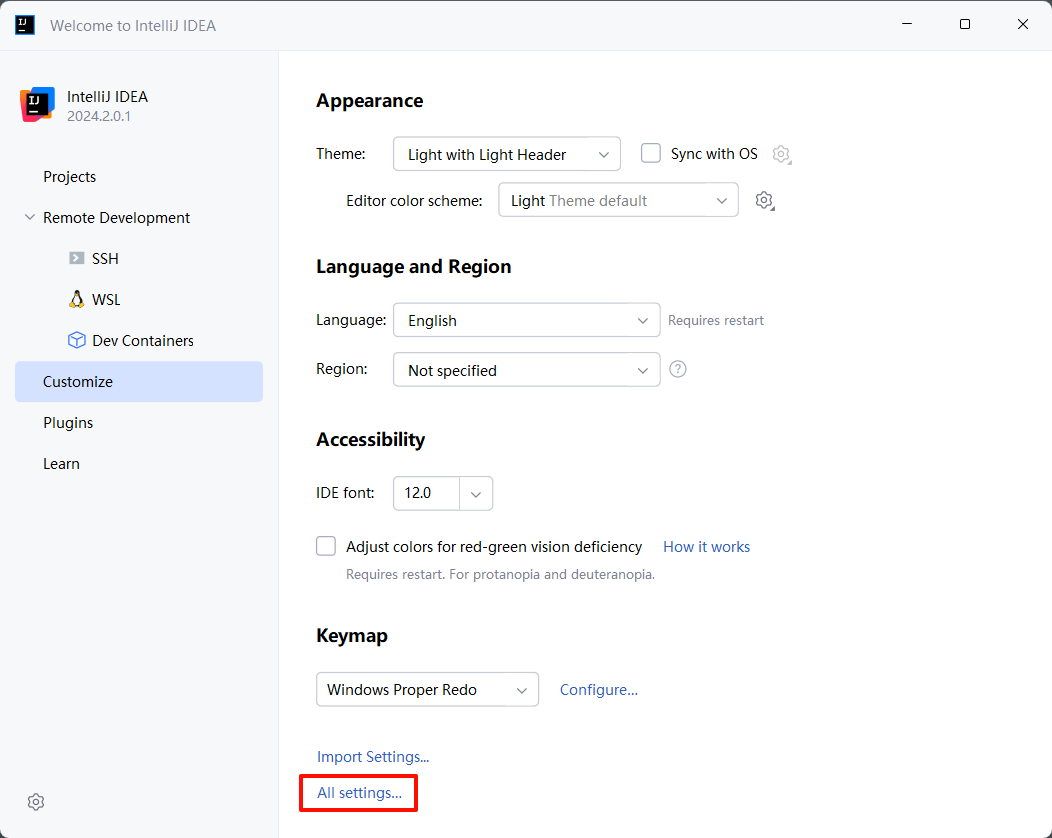
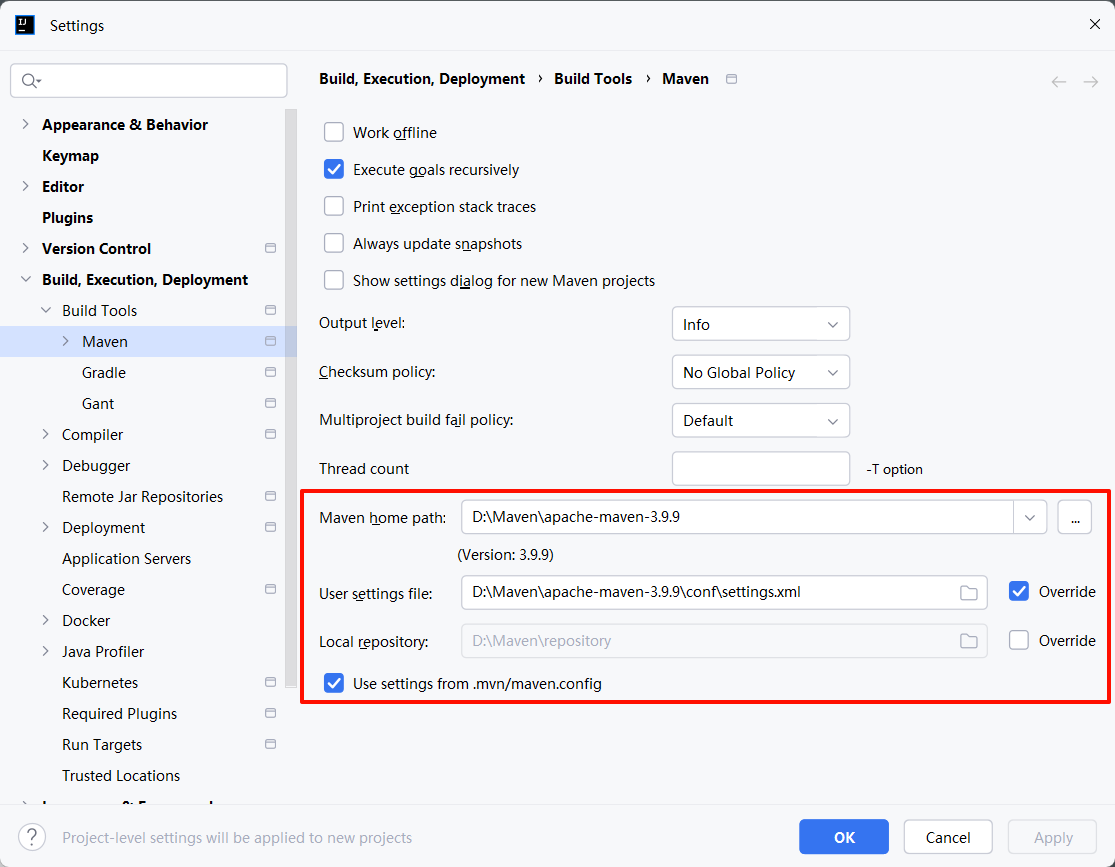
先设置 Maven。以前每次建立项目都要把 Maven 重新指定到我们自己安装的位置,很繁琐。这里可以把 IDEA 内置的 Maven 配置永久修改,后续新建项目或者模块都使用新配置。
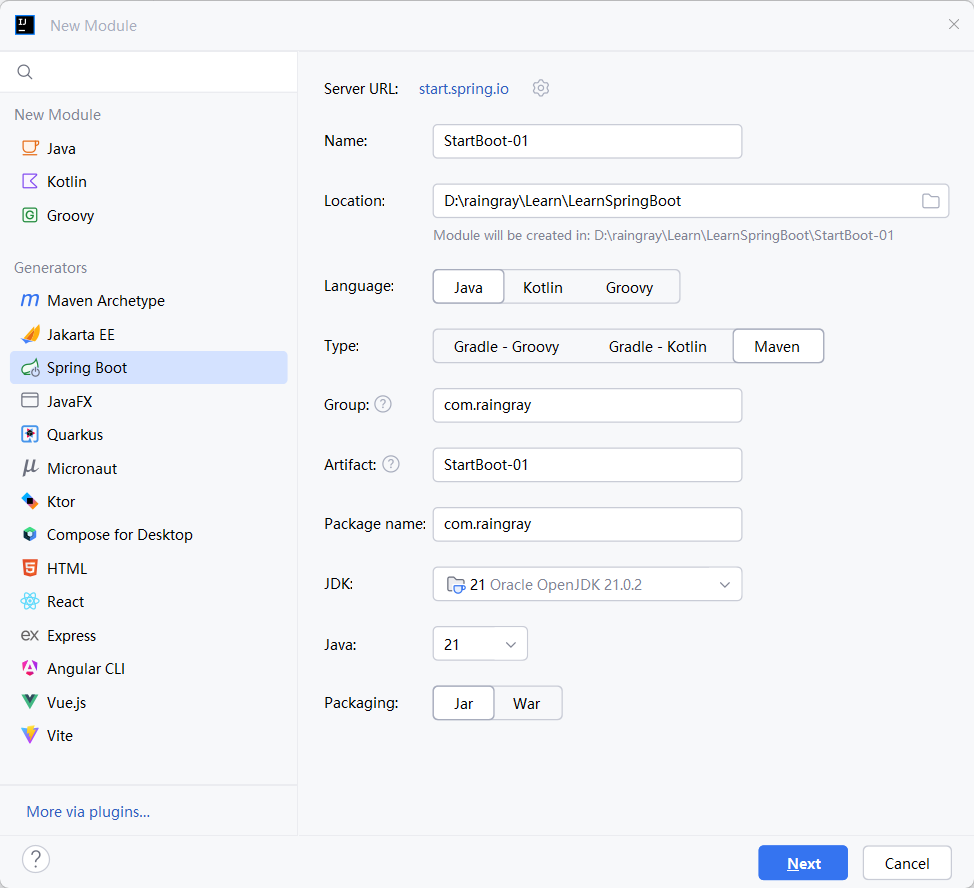
使用 Spring Initializr 模板向导的方式快速创建脚手架。这里是从 start.spring.io 从下载的文件。
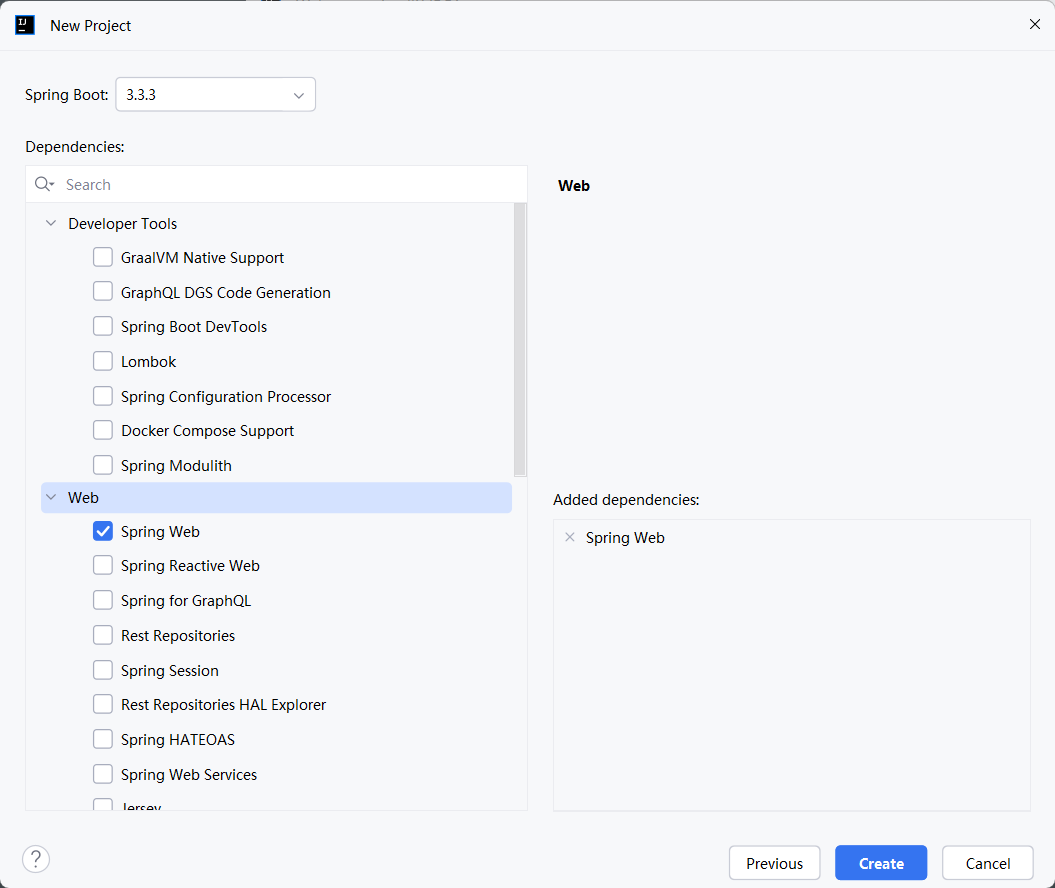
1.1 依赖管理
首先当前项目要依赖父工程。
<parent>
    <groupId>org.springframework.boot</groupId>
    <artifactId>spring-boot-starter-parent</artifactId>
    <version>3.3.3</version>
    <relativePath/> <!-- lookup parent from repository -->
</parent>
做后面只需要对应启动器就好,做 Web 开发就引入 web。
<dependency>
    <groupId>org.springframework.boot</groupId>
    <artifactId>spring-boot-starter-web</artifactId>
</dependency>
引入时会发现连版本号都不用指定,这是因为在父依赖 spring-boot-starter-parent 继承的 spring-boot-dependencies 定义了版本信息。
引入完成后会自动继承所有跟 Web 开发相关依赖,Spring MVC、Spring、Servlet 这些不需要一个个手动操作。
org.springframework.boot:spring-boot-starter-web:3.3.3
- org.springframework.boot:spring-boot-starter:3.3.3
org.springframework.boot:spring-boot-starter-json:3.3.3
- com.fasterxml.jackson.core:jackson-databind:2.17.2
- org.springframework.boot:spring-boot-starter-tomcat:3.3.3
- org.springframework:spring-web:6.1.12
- org.springframework:spring-webmvc:6.1.12
如果已经有父工程,那怎么配置?可以使用 dependencyManagement 引入 spring-boot-dependencies 依赖,通过设置 type 为 pom 表示我引入的是 pom 而不是里面具体的 jar 包,设置 scope 为 import 表示我要导入这个依赖里面的 dependencyManagement 内容。
<dependencyManagement>
    <dependencies>
        <dependency>
            <groupId>org.springframework.boot</groupId>
            <artifactId>spring-boot-dependencies</artifactId>
            <version>3.3.3</version>
            <type>pom</type>
            <scope>import</scope>
        </dependency>
    </dependencies>
</dependencyManagement>
随后在当前工程引入依赖就不需要指定版本号。
<dependencies>
    <dependency>
        <groupId>org.springframework.boot</groupId>
        <artifactId>spring-boot-starter-web</artifactId>
    </dependency>
</dependencies>
1.2 程序入口
Spring Boot 配置类。
package com.raingray;

import org.springframework.boot.SpringApplication;
import org.springframework.boot.autoconfigure.SpringBootApplication;

@SpringBootApplication
public class StartBoot01Application {
    public static void main(String[] args) {
        SpringApplication.run(StartBoot01Application.class, args);
    }
}
@SpringBootApplication 等同于使用:
- @SpringBootConfiguration,标识当前类是配置类
- @EnableAutoConfiguration,启动自动配置。就是这个注解帮我们引入的 starter 做默认值配置,如果不想用默认配置只用改对应配置文件的 key 就好。
- @ComponentScan,它自动扫描包这个类当前包或者所有子包的组件。
既然自动扫描就在当前包 com.raingray 下建立 controller 包放控制器,内容是访问根路径自动响应 Hello Word。
package com.raingray.controller;

import org.springframework.web.bind.annotation.GetMapping;
import org.springframework.web.bind.annotation.RestController;

@RestController
public class IndexController {
    @GetMapping("/")
    public String Index() {
        return "Hello World";
    }
}
随后启动的配置类,默认会用内置 Tomcat 在 0.0.0.0 的 8080 端口开启监听,访问 / 首页就返回 "Hello World"。
2 常用注解
2.1 @SpringBootApplication
默认只扫描当前类所在的包和其子包,要自定义扫描可以用 scanBasePackages 属性来指定包名。
@SpringBootApplication(scanBasePackages = {"com"})根本上还是使用 @ComponentScan 注解做的扫描,只是人家用别名替代。
@AliasFor(
    annotation = ComponentScan.class,
    attribute = "basePackages"
)
String[] scanBasePackages() default {};
2.2 @SpringBootConfiguration
一些普通配置类可以用 @Configuration,而 Spring Boot 配置类可以用 @SpringBootConfiguration,好做区分。
2.3 @Import 注册 Bean
创建 Bean 的另一种方式是用 @Import,它常用语把第三方组件注册成 Bean,创建完 Bean 后,Bean 的名称是全限定名。
这里创建一个 Test.java。
package com.raingray.bean;

public class Test {
    private String test;

    public String getTest() {
        return test;
    }

    public void setTest(String test) {
        this.test = test;
    }

    @Override
    public String toString() {
        return "Test{" +
                "test='" + test + '\'' +
                '}';
    }
}
在 Spring Boot 配置类中直接用 @Import 导入。
package com.raingray.conf;

import com.raingray.bean.Test;
import org.springframework.boot.SpringApplication;
import org.springframework.boot.autoconfigure.SpringBootApplication;
import org.springframework.context.ConfigurableApplicationContext;
import org.springframework.context.annotation.Import;

import java.util.Arrays;

@Import(Test.class)
@SpringBootApplication
public class SpringBootConf {
    public static void main(String[] args) {
        ConfigurableApplicationContext ioc = SpringApplication.run(SpringBootConf.class, args);
        String[] beanNamesForType = ioc.getBeanNamesForType(Test.class);
        System.out.println(Arrays.toString(beanNamesForType));

        Test bean = ioc.getBean("com.raingray.bean.Test", Test.class);
        bean.setTest("test字符");
        System.out.println(bean);
    }
}
后面就可以在 IoC 容器中找到这个 Bean,名称确实是全限定名,而且 Bean 也可以使用。
[com.raingray.bean.Test]
Test{test='test字符'}
2.4 条件判断
@ConditionalOnXxx 是条件注解,很有多个可以在 API 文档中搜前缀 @ConditionalOn,它在类上和方法上使用,作用是当某个条件满足时就自动把这个方法或者类运行,最后注册为 Bean 放到 IoC 容器中。
比如在配置类中用 @Bean、@Import 和 @ComponentScan 注解去注册 Bean,有条件判断注解的情况下,只有条件满足的情况才会去注册,不满足不注册。
1.在类上使用
放在类上,当前配置类中所有使用 @Bean 方法会被检查,此外 @Import 和 @ComponentScan(@SpringBootApplication 本质上就是用了 @ComponenetScan) 也会被检查。
package com.raingray.conf;

import com.raingray.bean.Test;
import org.springframework.boot.SpringApplication;
import org.springframework.boot.autoconfigure.SpringBootApplication;
import org.springframework.boot.autoconfigure.condition.ConditionalOnResource;
import org.springframework.context.annotation.Bean;
import org.springframework.context.annotation.Import;

@SpringBootApplication(scanBasePackages = {"com.test"})
@Import(Test.class)
@ConditionalOnResource(resources = {"application.properties", "static.yaml"})
public class SpringBooConditionalAnnotationtConf {
    public static void main(String[] args) {
        var ioc = SpringApplication.run(SpringBooConditionalAnnotationtConf.class, args);

        String[] beanDefinitionNames = ioc.getBeanDefinitionNames();
        System.out.println("IoC 容器中的 Bean 对象:");
        for (String beanDefinitionName : beanDefinitionNames) {
            switch (beanDefinitionName) {
                case "printStr":
                    System.out.println("我是 printStr:" + ioc.getBean("printStr"));
                    break;
                case "com.raingray.bean.Test":
                    System.out.println("我是 com.raingray.bean.Test:" + ioc.getBean("com.raingray.bean.Test"));
                    break;
                case "testLeanRegistBean":
                    System.out.println("我是 com.test 包下的 Bean 叫 testLeanRegistBean,对应对象是:" + ioc.getBean("testLeanRegistBean"));
                    break;
            }
        }
    }

    @Bean
    protected Object printStr() {
        return new Object();
    }
}
运行后 @ConditionalOnResource 确实在类根路径下检查到有 application.properties 和 static.yaml 存在,所以成功注册 Bean。只要有一个失败就无法注册。
IoC 容器中的 Bean 对象:
我是 com.test 包下的 Bean 名字叫 testLeanRegistBean,对应对象是:com.test.TestLeanRegistBean@73971965
我是 @Import 注册的 Bean Test.class 名字叫 com.raingray.bean.Test,对应对象是:Test{test='null'}
我是 com.raingray.conf.SpringBooConditionalAnnotationtConf 配置类中的 Bean 名字叫printStr,对应对象是:java.lang.Object@76a14c8d
2.在方法上使用
在方法上用条件注册只会影响这个方法最后是否注册 Bean,不影响类上 @Import 和 @ComponentScan 去注册。
这里只要 application.properties 和 static.yaml 存在那么就会向 IoC 容器添加名为 printStr 的 Bean,只要其中一个不存在就不注册。
@ConditionalOnResource(resources = {"application.properties", "static.yaml"})
@Bean
protected Object printStr() {
    return new Object();
}
2.5 属性绑定
什么是属性绑定呢?通常 .properties 配置文件中会有 key 和 value,如果想把 wztsx.value 的值赋给给某个 Bean 会比较麻烦,需要手动调 setter 方法,或者使用其他注解进行注入。
wztsx.value=strialz通过 @ConfigurationProperties 设置好对应的匹配规则,就可以自动调用 setter 完成赋值。
前提是属性配置文件的 key 和 Bean 对象 setter 方法名一致进行赋值,比如配置文件 key 是 value 那么会调对应 setter 方法 setValue。
1.@ConfigurationProperties 在类上使用
在类根路径下属性配置文件 application.properties 添加 key 和 value。
ezi.value=没什么用的值
value=strialz1111
创建属性配置类 PropertiesClass.java,用 @Component 把它放入 IoC 管理,随后用 @ConfigurationProperties 绑定 .properties key 为 value 的值。如果想要匹配 ezi.value 的值,需要在注解 value 元素进行赋值,比如赋值成 ezi,这样就会匹配 以 ezi 开始的 ezi.value 的值。
package com.raingray.bean;

import org.springframework.boot.context.properties.ConfigurationProperties;
import org.springframework.stereotype.Component;

@Component
@ConfigurationProperties
//@ConfigurationProperties("ezi")
public class PropertiesClass {
    public PropertiesClass() {
        System.out.println("PropertiesClass 无参数构造方法被执行");
    }

    public PropertiesClass(String value) {
        this.value = value;
    }

    private String value;

    public String getValue() {
        return value;
    }

    public void setValue(String value) {
        System.out.println("setter 赋值");
        this.value = value;
    }

    @Override
    public String toString() {
        return "propertiesClass{" +
                "value='" + value + '\'' +
                '}';
    }
}
通过 IoC 容器检查是否成功赋值。
package com.raingray.conf;

import com.raingray.bean.PropertiesClass;
import org.springframework.boot.SpringApplication;
import org.springframework.boot.autoconfigure.SpringBootApplication;

@SpringBootApplication(scanBasePackages = "com.raingray.bean")
public class SpringBooPropertiesBlindConf {
    public static void main(String[] args) {
        var ioc = SpringApplication.run(SpringBooPropertiesBlindConf.class, args);

        String[] beanDefinitionNames = ioc.getBeanNamesForType(PropertiesClass.class);
        if (beanDefinitionNames.length > 0) {
            PropertiesClass bean = ioc.getBean(beanDefinitionNames[0], PropertiesClass.class);
            System.out.println("IoC 容器中的 Bean 对象:" + bean);
        }
    }
}
运行输出。
PropertiesClass 无参数构造方法被执行
setter 赋值
IoC 容器中的 Bean 对象:propertiesClass{value='strialz1111'}
2.@ConfigurationProperties 在方法上使用
在方法上用就是针对方法的返回对象进行匹配,匹配原理和类上使用一致。
要使用必须当前这个属性配置类对象有放到 IoC 进行管理,在方法就 @Bean 注册。不管怎么变化,必须要求这个属性配置类在 IoC 里。
先把属性配置类创建出来,不用注册成 Bean,一会儿会在方法中复测。这里内容一致,就不再重复写。
public class PropertiesClass {
......
}
使用 @Bean 注册为 Bean,名称是 matchAttribute。
package com.raingray.conf;

import com.raingray.bean.PropertiesClass;
import org.springframework.boot.SpringApplication;
import org.springframework.boot.autoconfigure.SpringBootApplication;
import org.springframework.boot.context.properties.ConfigurationProperties;
import org.springframework.context.annotation.Bean;

@SpringBootApplication(scanBasePackages = "com.raingray.bean")
public class SpringBooPropertiesBlindConf {
    public static void main(String[] args) {
        var ioc = SpringApplication.run(SpringBooPropertiesBlindConf.class, args);

        String[] beanDefinitionNames = ioc.getBeanNamesForType(PropertiesClass.class);
        if (beanDefinitionNames.length > 0) {
            PropertiesClass bean = ioc.getBean(beanDefinitionNames[0], PropertiesClass.class);
            System.out.println("IoC 容器中的 Bean 对象:" + bean);
        }
    }

    @Bean
    @ConfigurationProperties("ezi")
    protected PropertiesClass matchAttribute() {
        return new PropertiesClass();
    }
}
运行结果。
PropertiesClass 无参数构造方法被执行
setter 赋值
IoC 容器中的 Bean 对象:propertiesClass{value='没什么用的值'}
3.@EnableConfigurationProperties
有时候需要把第三方配置类和我们的配置文件做绑定,但是第三方配置类 Spring Boot 无法扫描到,创建不了 Bean 就没法绑定。这时给 @EnableConfigurationProperties 的 value 元素传递个 Class 对象,背会自动用 @Import 帮你创建这个 Bean,第三方类只需写好 @ConfigurationProperties 即可。
application.properties 配置文件添加键值。
ezzi.value=没什aaaa么用的值wa创建属性配置类 PropertiesClass2.java。自动匹配 ezzi 开头的值。
package com.raingray.bean;

import org.springframework.boot.context.properties.ConfigurationProperties;

@ConfigurationProperties("ezzi")
public class PropertiesClass2 {
    public PropertiesClass2() {
        System.out.println("PropertiesClass2 无参数构造方法被执行");
    }

    public PropertiesClass2(String value) {
        this.value = value;
    }

    private String value;

    public String getValue() {
        return value;
    }

    public void setValue(String value) {
        System.out.println("PropertiesClass2 setter 赋值");
        this.value = value;
    }

    @Override
    public String toString() {
        return "PropertiesClass2{" +
                "value='" + value + '\'' +
                '}';
    }
}
@EnableConfigurationProperties 只能在类上使用。使用 @EnableConfigurationProperties 注册 PropertiesClass2.class 对象到 IoC。
package com.raingray.conf;

import com.raingray.bean.PropertiesClass2;
import org.springframework.boot.SpringApplication;
import org.springframework.boot.autoconfigure.SpringBootApplication;
import org.springframework.boot.context.properties.EnableConfigurationProperties;

@EnableConfigurationProperties(PropertiesClass2.class)
@SpringBootApplication
public class SpringBooOtherPropertiesBlindConf {
    public static void main(String[] args) {
        var ioc = SpringApplication.run(SpringBooOtherPropertiesBlindConf.class, args);

        String[] beanDefinitionNames = ioc.getBeanNamesForType(PropertiesClass2.class);
        if (beanDefinitionNames.length > 0) {
            System.out.println("Bean 的名称是:" + beanDefinitionNames[0]);
            PropertiesClass2 bean = ioc.getBean(beanDefinitionNames[0], PropertiesClass2.class);
            System.out.println("IoC 容器中的 Bean 对象:" + bean);
        }
    }
}
运行后发现成功绑定。
PropertiesClass2 无参数构造方法被执行
PropertiesClass2 setter 赋值
Bean 的名称是:ezzi-com.raingray.bean.PropertiesClass2
IoC 容器中的 Bean 对象:PropertiesClass2{value='没什aaaa么用的值wa'}
3 自动配置
前面提到过 Spring Boot 在默认情况下会做很多自动配置减少工作量,下面看看大致自动配置的原理。
1.启动自动配置
@EnableAutoConfiguration,最终调到 @EnableAutoConfiguration 注解,这个注解里使用 @Import({AutoConfigurationImportSelector.class}) 做自动配置。
2.配置哪些东西
导入 starter 后 -> spring-boot-starter -> spring-boot-autoconfigure,spring-boot-autoconfigure 包里面 META-INF/spring/org.springframework.boot.autoconfigure.AutoConfiguration.imports 这个文件定义了要导入哪些自动配置类,这些 xxxxAutoConfiguration 配置类就在当前包里面定义着。
3.按需配置
不是 AutoConfiguration.imports 里面所有配置类都会运行,每个配置类上都有 @ConditionalOnClass 条件注解,它就是用来判断有没导入这类(导入 starter 后会自动引入),只有类被导入的情况下才会执行这个类做自动配置。
具体的默认配置是怎么做的呢?其实每个配置类中都有 @EnableConfigurationProperties 把配置文件中的值和配置类对象做绑定,配置类直接调用 IoC 中的属性配置对象就可以自动赋值,哪怕没主动设置配置文件对应配置类也有默认值存在。站在开发的角度看,我们只需要配置属性文件就成完成配置的更改。
具体配置了哪些可以开启 debug 模式,从报告中能看出来。
debug=true自动配置报告具体内容。
============================
CONDITIONS EVALUATION REPORT
============================


Positive matches:
-----------------

   AopAutoConfiguration matched:
      - @ConditionalOnProperty (spring.aop.auto=true) matched (OnPropertyCondition)

   AopAutoConfiguration.ClassProxyingConfiguration matched:
      - @ConditionalOnMissingClass did not find unwanted class 'org.aspectj.weaver.Advice' (OnClassCondition)
      - @ConditionalOnProperty (spring.aop.proxy-target-class=true) matched (OnPropertyCondition)

   ApplicationAvailabilityAutoConfiguration#applicationAvailability matched:
      - @ConditionalOnMissingBean (types: org.springframework.boot.availability.ApplicationAvailability; SearchStrategy: all) did not find any beans (OnBeanCondition)

   DataSourceAutoConfiguration matched:
      - @ConditionalOnClass found required classes 'javax.sql.DataSource', 'org.springframework.jdbc.datasource.embedded.EmbeddedDatabaseType' (OnClassCondition)
      - @ConditionalOnMissingBean (types: io.r2dbc.spi.ConnectionFactory; SearchStrategy: all) did not find any beans (OnBeanCondition)

   DataSourceConfiguration.Hikari matched:
      - @ConditionalOnClass found required class 'com.zaxxer.hikari.HikariDataSource' (OnClassCondition)
      - @ConditionalOnProperty (spring.datasource.type=com.zaxxer.hikari.HikariDataSource) matched (OnPropertyCondition)
      - @ConditionalOnMissingBean (types: javax.sql.DataSource; SearchStrategy: all) did not find any beans (OnBeanCondition)

   ......


Negative matches:
-----------------

   ActiveMQAutoConfiguration:
      Did not match:
         - @ConditionalOnClass did not find required class 'jakarta.jms.ConnectionFactory' (OnClassCondition)

   AopAutoConfiguration.AspectJAutoProxyingConfiguration:
      Did not match:
         - @ConditionalOnClass did not find required class 'org.aspectj.weaver.Advice' (OnClassCondition)

   ......

Exclusions:
-----------

    None


Unconditional classes:
----------------------

    org.springframework.boot.autoconfigure.context.ConfigurationPropertiesAutoConfiguration

    org.springframework.boot.autoconfigure.ssl.SslAutoConfiguration

    org.springframework.boot.autoconfigure.context.LifecycleAutoConfiguration

......4 YAML 语法
YAML 可以把常见的数据类型结构化传输数据用,看起来可读性高。当前最新版本是 1.2.2
相比 Properties 配置,在 Spring Boot 开发中,大家用的更多是用 YAML 作为配置文件,它的表达力比 Java 中的 Properties 更好,YAML 有 .yaml 和 .yml 这两种常见的后缀名。
YAML 把常见的数据结构抽象成三种:
- mappings (hashes/dictionaries),字典和哈希这种映射关系
- sequences (arrays/lists),数组和列表序列关系
- scalars (strings/numbers),最后就是常见的字面量字符串、数字、布尔、时间......
1.sequences
基本用法就是 key 和 value 之间用 : 做冒号分隔符,这个冒号后面有个空格。key 的命名时两个单词之间要用连字符分开,不建议用驼峰,比如 stringArray 要写成 string-array。
key: value等同于 JSON。
{"key": "value"}没有多行注释语法,相要注释多行就用多个井号。
# 我是注释数组原始写法用 - 连字符标识每个元素,有层级关系用空格做缩进,一般默认两个空格,当然不限制个数只要元素之间缩进统一就行。数组另一种写法是,跟 JS 数组一样。
- value1
- value2
- value3

array:
  - 1
  - 2
  - 3

key: ["value1", "value2", "value3"]
等同于 JSON。
["value1", "value2", "value3"]

{"array": [1, 2, 3]}

{"key":["value1","value2","value3"]}
2.Map 集合
属性值存数组和对象。
key:
  key1: value1
  key2: {"noob1": a, "noob2": b}
  key3: [1, 2, 3]
  key4:
    - 4
    - 5
    - a
  key5:
    name: c
    age: 1
对应 JSON。
{
    "key": {
        "key1": "value1",
        "key2": {
            "noob1": "a",
            "noob2": "b"
        },
        "key3": [
            1,
            2,
            3
        ],
        "key4": [
            4,
            5,
            "a"
        ],
        "key5": {
            "name": "c",
            "age": 1
        }
    }
}
也能碰到外面套数组奇怪的写法,只要有连字符就认为里面内容是数组,这两种写法结果都是一样的。
- asd: a
  a: b
  c: d

-
  asd: a
  a: b
  c: d
对应 JSON。
[
    {
        "asd": "a",
        "a": "b",
        "c": "d"
    }
]
3.scalars
常见的数据类型都列出来了。
string-obj:
  plain-string: this is string # 不加引号也是字符串
  string-double-quote: "string \n %^&)!@ az 121" # 不转义特殊字符
  string-single-quote: 'string \n sadf l' # 自动转移特殊字符
  string-raw-1: | # 最后一行会带 \n 换行符
    第一句话完成换行
    第二句话完成
  string-raw-1-end-nowarp: |- # 使用连字符可以去除最后一行 \n 换行符
    第一句话完成换行
    第二句话完成
  string-raw-2: > # 除了最后一行会有 \n 换行符外,所有的换行自动折叠变空格。
    123123
    123123123
    a阿三
  string-raw-2-end-nowarp: >- # 使用连字符可以去除末尾 \n 换行符
    123123
    123123123
    a阿三
number-obj:
  - integer: 1
  - float1: 1.1
  - float2: {floag-value-1: 1.23015e+3, float-value-2: 54546}  # 使用花括号也可以声明对象
boolean-obj:
  - true
  - false
  - ~ # 波浪号表示 null
date-obj:
  - date: 2024/09/07
  - datetime: 2024/09/07 17:09:01
对应 JSON
{
    "string-obj": {
        "plain-string": "this is string",
        "string-double-quote": "string \n %^&)!@ az 121",
        "string-single-quote": "string \\n sadf l",
        "string-raw-1": "第一句话完成换行\n第二句话完成\n",
        "string-raw-1-end-nowarp": "第一句话完成换行\n第二句话完成",
        "string-raw-2": "123123 123123123 a阿三\n",
        "string-raw-2-end-nowarp": "123123 123123123 a阿三"
    },
    "number-obj": [
        {
            "integer": 1
        },
        {
            "float1": 1.1
        },
        {
            "float2": {
                "floag-value-1": 1230.15,
                "float-value-2": 54546
            }
        }
    ],
    "boolean-obj": [
        true,
        false,
        null
    ],
    "date-obj": [
        {
            "date": "2024-09-07T00:00:00.000Z"
        },
        {
            "datetime": "2024-09-07T17:09:01.000Z"
        }
    ]
}
5 日志
System.out.println 打印日志记录不好的点在于信息记录不足,比如日志归档、日志级别这些功能没有,这在生产应用中排错调优是很重要的数据源(使用的时候要考虑到日志安全问题,敏感数据需要加密存储)。
日志有很多接口,JCL(Jakarta Commons Logging)、SLF4j(Simple Logging Facade For Java)、jboss-logging,这些接口对应实现有 Log4j、JUL(java.util.logging)、Logback、Log4j2。
当你引入了任何启动器后最终都会依赖 spring-boot-starter,而它就自动使用传递过来的依赖 logback 作为默认的日志功能(对应接口是 sf4j),所以没必要专门引入 spring-boot-starter-logging。
spring-boot-starter
spring-boot-starter-logging
- logback-classic
- log4j-to-slf4j
- jul-to-slf4j
怎么整合其他功能到 Spring Boot,首先看看官方有没提供启动器,没有提供去 Maven 仓库找第三方启动器。找到引入启动器后在启动器包里找找 xxxAutoConfigure 自动配置类,从自动配置类里以后看看 @EnableConfigurationProperties 绑定了哪个配置类,之后就按照自动配置类和属性配置类中的条件注解去配置文件中配指定值。
但是日志不一样,他没有 xxxAutoConfigure 自动配置类,因为需要程序启动的时候就要用日志,而自动配置类是应用启动后才使用,所以没有自动配置类。具体怎么配置是使用监听器完成的操作。
org
└─ springframework
       └─ boot
              └─ autoconfigure
                     └─ logging
                            ├─ ConditionEvaluationReportLogger.class
                            ├─ ConditionEvaluationReportLoggingListener$ConditionEvaluationReportListener.class
                            ├─ ConditionEvaluationReportLoggingListener.class
                            ├─ ConditionEvaluationReportLoggingProcessor.class
                            └─ ConditionEvaluationReportMessage.class
5.1 日志格式
没有主动配置日志的情况下 Spring Boot 应用启动后,日志格式大概如下。
2024-09-08T21:12:38.709+08:00  INFO 28012 --- [log-test] [           main] c.r.StartBootLogging01Application        : Starting StartBootLogging01Application using Java 21.0.2 with PID 28012 (D:\raingray\Learn\LearnSpringBoot\StartBoot-logging-01\target\classes started by raingray in D:\raingray\Learn\LearnSpringBoot)
2024-09-08T21:12:38.713+08:00  INFO 28012 --- [log-test] [           main] c.r.StartBootLogging01Application        : No active profile set, falling back to 1 default profile: "default"
2024-09-08T21:12:39.531+08:00  INFO 28012 --- [log-test] [           main] o.s.b.w.embedded.tomcat.TomcatWebServer  : Tomcat initialized with port 8080 (http)
2024-09-08T21:12:39.546+08:00  INFO 28012 --- [log-test] [           main] o.apache.catalina.core.StandardService   : Starting service [Tomcat]
2024-09-08T21:12:39.554+08:00  INFO 28012 --- [log-test] [           main] o.apache.catalina.core.StandardEngine    : Starting Servlet engine: [Apache Tomcat/10.1.28]
2024-09-08T21:12:39.604+08:00  INFO 28012 --- [log-test] [           main] o.a.c.c.C.[Tomcat].[localhost].[/]       : Initializing Spring embedded WebApplicationContext
2024-09-08T21:12:39.605+08:00  INFO 28012 --- [log-test] [           main] w.s.c.ServletWebServerApplicationContext : Root WebApplicationContext: initialization completed in 844 ms
2024-09-08T21:12:39.931+08:00  INFO 28012 --- [log-test] [           main] o.s.b.w.embedded.tomcat.TomcatWebServer  : Tomcat started on port 8080 (http) with context path '/'
2024-09-08T21:12:39.937+08:00  INFO 28012 --- [log-test] [           main] c.r.StartBootLogging01Application        : Started StartBootLogging01Application in 1.742 seconds (process running for 2.344)
以最后一行为例说明日志格式
2024-09-08T21:12:39.937+08:00,日志发生时间INFO,日志等级28012,程序进程 ID,可以用 jps 查询系统运行的所有 Java 程序 PID。PS C:\Users\gbb> jps 27936 Main 26932 Launcher 26012 Jps 28012 StartBootLogging01Application 28156 RemoteMavenServer36---,自定义的分隔符没什么含义[log-test],应用名称[ main],线程名称c.r.StartBootLogging01Application,类全限定名,用来定位哪个类发出的异常,前面包名显示是首字母缩写,就是怕有些名字太长影响性能。:,自定义的分隔符没什么含义Started StartBootLogging01Application in 1.742 seconds (process running for 2.344),具体日志信息
日志等级从高到底排序,高级别包含下面所有级别数据,比如 INFO 就包含 WRN 及以下级别的日志:
- ALL:打印所有日志
- TRACE:追踪框架详细流程日志,一般不使用
- DEBUG:开发调试细节日志
- INFO:关键、感兴趣信息日志
- WARN:警告但不是错误的信息日志,比如:版本过时
- ERROR:业务错误日志,比如出现各种异常
- FATAL:致命错误日志,比如 jvm 系统崩溃
- OFF:关闭所有日志记录
在配置文件中使用 logging 前缀就可以自动提示出日志相关的配置项目。 默认情况下 logging.level.root 默认是 INFO 级别,表示只记录从 INFO 开始的级别,此时输出的 TRACE 和 DEBUG 就不会记录,。但是 logging.level.root 是可以重新配置为其他级别不用担心。如果想记录某个包或者类下指定级别日志信息,可以在 logging.level 后面添加包名或类全限定名。
// 设置 com.raingray.controller 包的下所有类日志输出级别从 info 开始
logging.level.com.raingray.controller=info

// 设置 com.raingray.controller.UserService 类日志输出级别从 info 开始
logging.level.com.raingray.service=WARN
有时候好几个类都需要统一设置到同一个级别,这样一一设置太麻烦了。
logging.level.com.raingray.service.a=WARN
logging.level.com.raingray.service.b=WARN
logging.level.com.raingray.service.c=WARN
日志提供了分组功能,把我们要设置包或者类都放到一个分组里,针对这个分组进行设置就好。
// 设置分组
logging.level.gourp.service=com.raingray.service.a, com.raingray.service.b, com.raingray.service.c

// 为分组设置日志级别
logging.level.service=WARN
Spring Boot 也有两个默认分组:
web
- org.springframework.core.codec
- org.springframework.http
- org.springframework.web
- org.springframework.boot.actuate.endpoint.web
- org.springframework.boot.web.servlet.ServletContextInitializerBeans
sql
- org.springframework.jdbc.core
- org.hibernate.SQL
- org.jooq.tools.LoggerListener
在控制台输出的日志还可以在配置文件中用 logging.pattern.console 设置对应格式。
# %d{yyyy-MM-dd HH:mm:ss.SSS},时间格式实例 2024-09-01 22:30:01.901
# %-5level,可以先看做 %level 去输出日志级别,后面的 %-5 是对齐
# [%thread],线程名称
# %logger,是用来记录类全限定名,方便定位那个类发出的日志,后面的 {15} 是用来把包名缩写成首字母,但类名不会缩写。中括号就是个字符串随便写的没什么特别含义,起个外观作用
# %msg,是具体异常的信息
# %n,换行符
logging.pattern.console=%d{yyyy-MM-dd HH:mm:ss.SSS} %-5level [%thread] %logger{15} ===> %msg%n
Spring Boot 3.3.3 控制台默认输出格式在 spring-boot 核心包里 org\springframework\boot\logging\logback\defaults.xml 定义。
${CONSOLE_LOG_PATTERN:-%clr(%d{${LOG_DATEFORMAT_PATTERN:-yyyy-MM-dd'T'HH:mm:ss.SSSXXX}}){faint} %clr(${LOG_LEVEL_PATTERN:-%5p}) %clr(${PID:- }){magenta} %clr(---){faint} %clr(%applicationName[%15.15t]){faint} %clr(${LOG_CORRELATION_PATTERN:-}){faint}%clr(%-40.40logger{39}){cyan} %clr(:){faint} %m%n${LOG_EXCEPTION_CONVERSION_WORD:-%wEx}}只想设置时间格式其他的都用 Spring Boot 默认配的可以使用 logging.pattern.dateformat。
logging.pattern.dateformat=yyyy-MM-dd HH:mm:ss.SSS5.2 日志用法
从工厂获取日志实例,传入当前类 Class 对象说明要记录这个类的日志。
import org.slf4j.Logger;
import org.slf4j.LoggerFactory;

public class UserServiceImpl implements UserService {
    private static final Logger log = LoggerFactory.getLogger(UserServiceImpl.class);

    public User getUserAllInfo(Map<String, Object> param) {
        log.info("查询参数:" + paramMap);
    ......
}
通过 Lombok 这个库可以不用写这个重复性的代码编写。使用前可以在 IntelliJ IDEA 安装 Lombok plugin,如果是团队使用,最好直接引入依赖,方便别人知道代码怎么生成的。
<dependency>
    <groupId>org.projectlombok</groupId>
    <artifactId>lombok</artifactId>
</dependency>
之后直接在类上添加 @Slf4j 注解,可以让我们在编译后自动插入这段代码,不需要显示的编码。但是仍然不推荐使用,调试起来比较困难。
@Slf4j
public class UserServiceImpl implements UserService {
    public User getUserAllInfo(Map<String, Object> param) {
        log.info("查询参数:" + paramMap);
    ......
}
日志输出信息不用字符串拼接内容,人家提供了占位符的用法,第一个花括号就是取值 a,第二个花括号取值 b。
log.info("日志信息 {} {}", a, b)5.3 日志存储
日志可以写到硬盘上,用 logging.file.name 做配置。
// 默认放到和配置文件同级别的目录下,以 1.log 命名。
logging.file.name=1.log

// 加上路径可以配置文件存到哪里。
logging.file.name=1.log
logging.file.path 可以配置日志存放目录,不写文件名,默认文件名是 spring.log。和 logging.file.name 一起使用,则 logging.file.path 失效。
logging.file.path="E:\\"光存到文件里还不行,时间长了文件特别大,可以配置按指定大小自动分割存到新日志文件里,最好可以按天数进行归档,每天一个文件。经过测试它并不会说达到指定大小后立马归档,会有个延时,这个时间不确定,具体原因位置。
logging.file.name=1.log

# 设置多大的日志文件才进行归档操作,默认值是 10MB
logging.logback.rollingpolicy.max-file-size=100MB

# ${LOG_FILE} 就是 logging.file.name 的值
# %d 就是针对年月日的时间格式化,最终日期会变成类似于 2024-09-01
# %i 是表明当前是第几个分割文件,默认从 0 开始。
# .gz 后缀表示自动用 gzip 对文件进行压缩放到压缩包里
logging.logback.rollingpolicy.file-name-pattern=${LOG_FILE}.%d{yyyy-MM-dd}.%i.gz

# 归档的文件文件最长保留多久,默认值是 7 天
logging.logback.rollingpolicy.max-history=180

# 日志总数量达到多大,自动覆盖旧日志,有存档就删除旧存档,好省出空间放新存档。
logging.logback.rollingpolicy.total-size-cap=100GB
对于存储到硬盘上的日志输出格式可以用 logging.pattern.file 配置。
logging.pattern.file=5.4 自定义日志配置文件
除了 .application 和 .yaml 在里面配置,Spring Boot 也支持使用 XML 进行配置,比如默认支持的就可以在类根路径上加 logback.xml,在里面用 XML 的方式配置日志。
如果不想用默认的 logback 的实现,可以切换到其他框架上,先排除现有的 logback 依赖,最后把新的日志框架加进来,最后添加 log4j2.xml 配置文件到类根路径,Spring Boot 会自动识别里面的配置并应用。
<dependency>
    <groupId>org.springframework.boot</groupId>
    <artifactId>spring-boot-starter-web</artifactId>
</dependency>
<dependency>
    <groupId>org.springframework.boot</groupId>
    <artifactId>spring-boot-starter</artifactId>
    <exclusions>
        <exclusion>
            <groupId>org.springframework.boot</groupId>
            <artifactId>spring-boot-starter-logging</artifactId>
        </exclusion>
    </exclusions>
</dependency>
<dependency>
    <groupId>org.springframework.boot</groupId>
    <artifactId>spring-boot-starter-log4j2</artifactId>
</dependency>
6. Web 开发
spring-boot-starter-web 启动器引入了 Spring Web MVC、Tomcat,这些都有自动配置类,会有默认配置。
org.springframework.boot.autoconfigure.web.servlet.DispatcherServletAutoConfiguration
org.springframework.boot.autoconfigure.web.servlet.ServletWebServerFactoryAutoConfiguration
org.springframework.boot.autoconfigure.web.servlet.error.ErrorMvcAutoConfiguration
org.springframework.boot.autoconfigure.web.servlet.HttpEncodingAutoConfiguration
org.springframework.boot.autoconfigure.web.servlet.MultipartAutoConfiguration
org.springframework.boot.autoconfigure.web.servlet.WebMvcAutoConfiguration
从配置类 @EnableConfigurationProperties 能够查到属性配置类,接着从属性配置配置类 @ConfigurationProperties 就能得知能够使用的前缀,结合属性配置类 setter 方法就知道能够使用哪些属性名。
| 自动配置类 | 属性配置类 | 配置项 |
|---|---|---|
| DispatcherServletAutoConfiguration | WebMvcProperties | spring.mvc |
| ServletWebServerFactoryAutoConfiguration | ServerProperties | server |
| ErrorMvcAutoConfiguration | WebProperties WebMvcProperties | spring.web spring.mvc |
| HttpEncodingAutoConfiguration | ServerProperties | server |
| MultipartAutoConfiguration | MultipartProperties | spring.servlet.multipart |
| WebMvcAutoConfiguration | WebProperties | spring.web |
静态资源配置
在 WebProperties 静态内部类 Resources 中定义了默认的静态资源路径。
@ConfigurationProperties("spring.web")
public class WebProperties {
    ......
    public static class Resources {
        private static final String[] CLASSPATH_RESOURCE_LOCATIONS = new String[]{"classpath:/META-INF/resources/", "classpath:/resources/", "classpath:/static/", "classpath:/public/"};
    ......
    }
}
这几个路径最后会被 WebMvcAutoConfiguration 的静态内部类 WebMvcAutoConfigurationAdapter#addResourceHandlers 方法注册,只要访问 /** 就会去这些目录找。
public static class WebMvcAutoConfigurationAdapter implements WebMvcConfigurer, ServletContextAware {
    ......
    public void addResourceHandlers(ResourceHandlerRegistry registry) {
        ......
        this.addResourceHandler(registry, this.mvcProperties.getStaticPathPattern(), (registration) -> {
            registration.addResourceLocations(this.resourceProperties.getStaticLocations());
            if (this.servletContext != null) {
                ServletContextResource resource = new ServletContextResource(this.servletContext, "/");
                registration.addResourceLocations(new Resource[]{resource});
            }

        });
    }
    ......
}
所以只要把静态资源放在类根路径下这几个文件夹就行:
- /META-INF/resources/
- /resources/
- /static/
- /public/
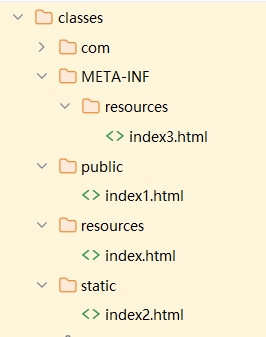
不想使用默认的这几个配置,也可以通过属性配置文件进行覆盖。spring.mvc.static-path-pattern 默认值是 /**,我们可以自定义前缀方便识别哪些路径是访问静态资源的,后续设置拦截器方便放行,spring.web.resources.static-locations 是访问的静态资源最终去哪个目录中找。
# 配置静态资源要匹配的 url-pattern
spring.mvc.static-path-pattern=/static/**

# 自动去哪个目录找这些静态资源,值是 String 数组
spring.web.resources.static-locations=classpath:/123, classpath:/455,
这里的做了静态路径映射后,默认还会给设置缓存。
private void addResourceHandler(ResourceHandlerRegistry registry, String pattern, Consumer<ResourceHandlerRegistration> customizer) {
    if (!registry.hasMappingForPattern(pattern)) {
        ResourceHandlerRegistration registration = registry.addResourceHandler(new String[]{pattern});
        customizer.accept(registration);
        // 设置缓存时间 Cache-Control: max-age=XXX,单位是秒,默认为 0。
        registration.setCachePeriod(this.getSeconds(this.resourceProperties.getCache().getPeriod()));

        registration.setCacheControl(this.resourceProperties.getCache().getCachecontrol().toHttpCacheControl());
        // 设置 Last-Modified 响应头
        registration.setUseLastModified(this.resourceProperties.getCache().isUseLastModified());
        this.customizeResourceHandlerRegistration(registration);
    }
}
setCachePeriod 设置缓存时间默认是 0 不缓存,可以用 spring.web.resources.cache.period 来指定缓存时间,如果通过 spring.web.resources.cache.cachecontrol 来设置缓存,spring.web.resources.cache.period 的值会被覆盖掉。设置这个的作用是,第一次浏览器请求资源,会真的从服务端响应的内容获取数据,第二次重新访问(要注意这里没有 If-Modified-Since 头)则是从硬盘缓存中读取。
setCacheControl,setUseLastModified 是 true 生效,可以通过 spring.web.resources.cache.use-last-modified 来设置默认值,第一次浏览器请求资源服务端会响应 Last-Modified 头,这个请求投的值代表了资源最近一次修改时间。
GET /index.html HTTP/1.1
Host: localhost
Accept-Encoding: gzip, deflate, br
Accept: text/html,application/xhtml+xml,application/xml;q=0.9,image/avif,image/webp,image/apng,*/*;q=0.8
Connection: keep-alive

HTTP/1.1 200
Vary: Origin
Vary: Access-Control-Request-Method
Vary: Access-Control-Request-Headers
Last-Modified: Tue, 10 Sep 2024 04:43:02 GMT
Accept-Ranges: bytes
Content-Type: text/html
Content-Length: 155
Date: Tue, 10 Sep 2024 04:49:28 GMT
Keep-Alive: timeout=60
Connection: keep-alive

<!DOCTYPE html>
<html lang="en">
<head>
  <meta charset="UTF-8">
  <title>resources 目录静态资源</title>
</head>
<body>1234

</body>
</html>
再次刷新浏览器页面,会请求相同资源,会把上次响应的 Last-Modified 值放到 If-Modified-Since 请求头里,服务端看到 If-Modified-Since 的值再比较请求资源的修改时间,如果一致,响应 304 状态码,不返回具体资源信息,这样会节约服务器处理的资源。浏览器看到 304 就会读缓存中的内容。
GET /index.html HTTP/1.1
Host: localhost
If-Modified-Since: Tue, 10 Sep 2024 04:43:02 GMT
Accept-Encoding: gzip, deflate, br
Accept: text/html,application/xhtml+xml,application/xml;q=0.9,image/avif,image/webp,image/apng,*/*;q=0.8
Connection: keep-alive

HTTP/1.1 304
Vary: Origin
Vary: Access-Control-Request-Method
Vary: Access-Control-Request-Headers
Last-Modified: Tue, 10 Sep 2024 04:43:02 GMT
Date: Tue, 10 Sep 2024 04:50:54 GMT
Keep-Alive: timeout=60
Connection: keep-alive
有两种情况会返回新的资源,首先是服务端发现 If-Modified-Since 值比 index.html 资源的修改时间小,说明请求的是旧资源。其次是 index.html 比 If-Modified-Since 值大,说明服务端最近刚更新了 index.html 内容,这两种情况都会设置响应状态码为 200 在响应体返回资源。
如果没用内置的 Web 容器,是打成 war 包单独部署其他容器中,可以启用默认 servlet 处理静态资源(默认值是不启用),就没必要操心这么多配置。
server.servlet.register-default-servlet=true前面介绍了配置默认值和配置文件配置,也可以通过类的方式来配置,这里和以前学 Spring MVC 一样,也可以通过实现 WebMvcConfigurer 接口来做配置。只是需要注意 @EnableWebMvc 添加以后所有的默认配置会失效,不添加就相当于对默认配置做补充。
为什么添加了 @EnableWebMvc 默认配置会失效?原因在于启用注解后自动在 IoC 注册 DelegatingWebMvcConfiguration,这个类是继承自 WebMvcConfigurationSupport。
@Import({DelegatingWebMvcConfiguration.class})但是 WebMvcAutoConfiguration 默认配置类上又有条件注解 @ConditionalOnMissingBean,意思是 IoC 中没有WebMvcConfigurationSupport 类型的 Bean 才会运行 WebMvcAutoConfiguration 类。
@ConditionalOnMissingBean(WebMvcConfigurationSupport.class)这里对静态资源 url-pattern 和 file-location 的映射和缓存设置,用类的方式重写一下。
package com.raingray.config;

import org.springframework.http.CacheControl;
import org.springframework.stereotype.Component;
import org.springframework.web.servlet.config.annotation.ResourceHandlerRegistry;
import org.springframework.web.servlet.config.annotation.WebMvcConfigurer;

import java.time.Duration;

// @EnableWebMvc // 启用默认配置就失效,等同于所有内容需要你手动实现
@Component
public class WebConfiguraion implements WebMvcConfigurer {
    @Override
    public void addResourceHandlers(ResourceHandlerRegistry registry) {
        registry.addResourceHandler("/static/**")
                // 路径格式一定要是 classpath:/xxx/",其中 xxx 是你目录名称,不然无法访问到
                .addResourceLocations("classpath:/123/", "classpath:/455/")
                .setCacheControl(CacheControl.maxAge(Duration.ofSeconds(3600)));
    }
}
最后就是配置优先级的问题,优先级从小到到的顺序是:默认配置 > 属性配置文件 > 类配置。
首页资源默认配置
首页也叫欢迎页,默认情况下访问 /**,都还是会去这几个目录找 index.html:
- /META-INF/resources/
- /resources/
- /static/
- /public/
路径匹配默认配置
路径匹配默认使用的是 PathPatternParser 风格,它性能更高,你要想切回 AntPathMatcher 也可以。
# 路径匹配风格默认值是 path_pattern_parser
spring.mvc.pathmatch.matching-strategy=ant-path-matcher
异常处理
Spring Boot 中 Web 异常处理优先级:局部处理异常 -> 全局处理异常 -> 自定义异常(是指覆盖默认异常) -> 默认异常。一旦前面的异常没有处理一直会往后传递交给默认异常处理。
我们没有处理异常的情况 ErrorMvcAutoConfiguration 自动配置类会调用 BasicErrorController 进行异常处理,具体呈现结果是根据不同 Accept,可能显示 Whitelabel Error Page,也可能显示 JSON 错误。
@Bean
@ConditionalOnMissingBean(value = ErrorController.class, search = SearchStrategy.CURRENT)
public BasicErrorController basicErrorController(ErrorAttributes errorAttributes,
        ObjectProvider<ErrorViewResolver> errorViewResolvers) {
    return new BasicErrorController(errorAttributes, this.serverProperties.getError(),
            errorViewResolvers.orderedStream().toList());
}
如果不想要交给 /error 处理异常,可以实现 ErrorController 接口,这样 ErrorMvcAutoConfiguration 自动配置类上 @ConditionalOnMissingBean 条件注解在 IoC 找到 BasicErrorController 类型的 Bean 就不会注册。这样能避免直接访问 /error 路径有 Spring Boot 默认错误处理的特征。
package com.raingray.controller;

import jakarta.servlet.http.HttpServletRequest;
import jakarta.servlet.http.HttpServletResponse;
import org.springframework.beans.factory.annotation.Autowired;
import org.springframework.boot.web.servlet.error.ErrorAttributes;
import org.springframework.boot.web.servlet.error.ErrorController;
import org.springframework.web.bind.annotation.GetMapping;
import org.springframework.web.bind.annotation.RestController;
import org.springframework.web.context.request.ServletWebRequest;

@RestController
public class MainErrorController implements ErrorController {
    @Autowired
    private ErrorAttributes errorAttributes;

    @GetMapping("/error")
    public String handleError(HttpServletRequest request, HttpServletResponse response) {
        ServletWebRequest servletWebRequest = new ServletWebRequest(request);
        Throwable error = errorAttributes.getError(servletWebRequest);
        return error.getMessage();
    }
}
另一类常见的异常就是 4xx,可能是 404、405、400.....之类的,可以用创建一个全局异常类继承ResponseEntityExceptionHandler抽象类,在继承的这个类就可以处理常见的 4xx、5xx 异常。
package com.raingray.controller;

import org.springframework.http.*;
import org.springframework.web.bind.MissingServletRequestParameterException;
import org.springframework.web.bind.annotation.*;
import org.springframework.web.context.request.WebRequest;
import org.springframework.web.servlet.mvc.method.annotation.ResponseEntityExceptionHandler;
import org.springframework.web.servlet.resource.NoResourceFoundException;

@ControllerAdvice
public class MyControllerAdvice extends ResponseEntityExceptionHandler{
    // 处理 404 异常
    @Override
    protected ResponseEntity<Object> handleNoResourceFoundException(NoResourceFoundException ex, HttpHeaders headers, HttpStatusCode status, WebRequest request) {
        String bodyOfResponse = "Not Found";
        HttpHeaders httpHeaders = new HttpHeaders();
        httpHeaders.set(HttpHeaders.CONTENT_TYPE, "text/plain; charset=utf-8");
        logger.error(headers);
        return new ResponseEntity<>(bodyOfResponse, httpHeaders, HttpStatus.NOT_FOUND);
    }

    // 处理 400 参数异常,一般参数缺失会触发
    @Override
    protected ResponseEntity<Object> handleMissingServletRequestParameter(MissingServletRequestParameterException ex, HttpHeaders headers, HttpStatusCode status, WebRequest request) {
        String bodyOfResponse = "Parameter Exception";
        HttpHeaders httpHeaders = new HttpHeaders();
        httpHeaders.set(HttpHeaders.CONTENT_TYPE, "text/plain; charset=utf-8");
        return new ResponseEntity<>(bodyOfResponse, httpHeaders, status);
    }

    // 当调用其他没有实现的 handle 就走我们定义的 handleExceptionInternal 方法。用来托底。
    @Override
    protected ResponseEntity<Object> handleExceptionInternal(Exception ex, Object body, HttpHeaders headers, HttpStatusCode statusCode, WebRequest request) {
        headers.set(HttpHeaders.CONTENT_TYPE, "text/plain; charset=utf-8");
        return new ResponseEntity<>(ex.getMessage(), headers, statusCode);
    }
}
从 ResponseEntityExceptionHandler 类源码来看,所有以 handle 开头的就是常见异常处理方法,你实现哪个 handle 就走你实现的 handle 方法,没实现就调父类中的 handleExceptionInternal 方法。为了避免默认走 handleExceptionInternal 方法,我们就自己单独实现它,所有未实现的 handle 方法被调用时都用我们指定的消息格式。
@Nullable
protected ResponseEntity<Object> handleHttpMediaTypeNotSupported(HttpMediaTypeNotSupportedException ex, HttpHeaders headers, HttpStatusCode status, WebRequest request) {
    return this.handleExceptionInternal(ex, (Object)null, headers, status, request);
}

@Nullable
protected ResponseEntity<Object> handleExceptionInternal(Exception ex, @Nullable Object body, HttpHeaders headers, HttpStatusCode statusCode, WebRequest request) {
    if (request instanceof ServletWebRequest servletWebRequest) {
        HttpServletResponse response = servletWebRequest.getResponse();
        if (response != null && response.isCommitted()) {
            if (this.logger.isWarnEnabled()) {
                this.logger.warn("Response already committed. Ignoring: " + ex);
            }

            return null;
        }
    }

    if (body == null && ex instanceof ErrorResponse errorResponse) {
        body = errorResponse.updateAndGetBody(this.messageSource, LocaleContextHolder.getLocale());
    }

    if (statusCode.equals(HttpStatus.INTERNAL_SERVER_ERROR) && body == null) {
        request.setAttribute("jakarta.servlet.error.exception", ex, 0);
    }

    return this.createResponseEntity(body, headers, statusCode, request);
}
嵌入式容器
关于运行 Servlet 的服务器,看 ServletWebServerFactoryAutoConfiguration 自动配置类上用 @Import 导入了三个 Servlet 工厂配置类。
ServletWebServerFactoryConfiguration.EmbeddedTomcat.class
ServletWebServerFactoryConfiguration.EmbeddedJetty.class
ServletWebServerFactoryConfiguration.EmbeddedUndertow.class
这几个工厂类上都有条件注解 @ConditionalOnClass,就拿 EmbeddedTomcat 为例,只有引入了 spring-boot-starter-tomcat,这几个类才会存在类路径中。所以没有引入对应对应 Web 容器不会被创建,Web 容器是在 IoC 容器创建的时候才会创建出来的。
@Configuration(proxyBeanMethods = false)
@ConditionalOnClass({ Servlet.class, Tomcat.class, UpgradeProtocol.class })
@ConditionalOnMissingBean(value = ServletWebServerFactory.class, search = SearchStrategy.CURRENT)
static class EmbeddedTomcat {
    @Bean
    TomcatServletWebServerFactory tomcatServletWebServerFactory(
            ObjectProvider<TomcatConnectorCustomizer> connectorCustomizers,
            ObjectProvider<TomcatContextCustomizer> contextCustomizers,
            ObjectProvider<TomcatProtocolHandlerCustomizer<?>> protocolHandlerCustomizers) {
        TomcatServletWebServerFactory factory = new TomcatServletWebServerFactory();
        factory.getTomcatConnectorCustomizers().addAll(connectorCustomizers.orderedStream().toList());
        factory.getTomcatContextCustomizers().addAll(contextCustomizers.orderedStream().toList());
        factory.getTomcatProtocolHandlerCustomizers().addAll(protocolHandlerCustomizers.orderedStream().toList());
        return factory;
    }
}
要想切换内置容器可以先移除 spring-boot-starter-web 中默认的 Tomcat,再引入 Jetty 或 Undertow 容器。
<dependency>
    <groupId>org.springframework.boot</groupId>
    <artifactId>spring-boot-starter-web</artifactId>
    <exclusions>
        <exclusion>
            <groupId>org.springframework.boot</groupId>
            <artifactId>spring-boot-starter-tomcat</artifactId>
        </exclusion>
    </exclusions>
</dependency>
<!-- Use Jetty instead -->
<dependency>
    <groupId>org.springframework.boot</groupId>
    <artifactId>spring-boot-starter-jetty</artifactId>
</dependency>
<!--<dependency>
    <groupId>org.springframework.boot</groupId>
    <artifactId>spring-boot-starter-undertow</artifactId>
</dependency>-->
ServletWebServerFactoryAutoConfiguration 自动配置类绑定的 ServerProperties 配置类,而这个配置类绑定的配置文件前缀是以 server 开始。
# 设置 TCP 监听端口号,默认值是 8080
server.port=80

# 设置监听地址,从网络连接来看默认值就是 0.0.0.0
server.address=0.0.0.0

#针对请求和响应是否强制设置为指定编码,这里编码是指 server.servlet.encoding.charset 的值,默认不启用。
server.servlet.encoding.force=true

# 默认 utf-8
server.servlet.encoding.charset=utf-8

# 默认 true
server.servlet.encoding.enabled=true

# 设置应用上下文访问路径,默认值是 /
server.servlet.context-path=upload

# 是否启用上传功能,默认是 true
spring.servlet.multipart.enabled=true

# 设置上传的文件大小,默认 1MB。
spring.servlet.multipart.max-file-size=10MB

# 达到指定字节大小就把文件写入磁盘,没达到就暂时放在内票,默认值为 0 表示每个上传的文件都写入磁盘
spring.servlet.multipart.file-size-threshold=0B

# 设置整个表单所有文件上传的总字节数,默认    10MB
spring.servlet.multipart.max-request-size=11MB

# 文件上传存放目录,默认值没有配置。
spring.servlet.multipart.location=upload
Tomcat 配置
# 默认值为 false,不开启 Tomcat 日志记录
server.tomcat.accesslog.enabled=true

# Tomcat 日志存放路径,可以写基于 Tomcat 安装位置的相对路径也可以写绝对路径,默认值是 log
server.tomcat.accesslog.directory=E:\\

# Tomcat 日志文件前缀,默认值是 access_log
server.tomcat.accesslog.prefix=access_log

# Tomcat 日志文件名,日期格式,默认值是 .yyyy-mm-dd
server.tomcat.accesslog.file-date-format=.yyyy-mm-dd

# Tomcat 日志文件后缀,默认值是 .log。这样完整的日志名称是 access_log.yyyy-mm-dd.log
server.tomcat.accesslog.suffix=.log
接口文档🔨
Web 应用接口管理
Swagger
knife4j
Actuator🔨
计划任务🔨
7 数据访问
创建数据库 mybatis,在里面建立表。
create table mybatis.t_user
(
    id         bigint auto_increment comment '用户 ID'
        primary key,
    name       varchar(255) not null comment '用户名',
    password   varchar(255) not null comment '用户密码',
    t_realname varchar(255) null comment '真实姓名',
    gender     varchar(1)   null comment '性别',
    tel        varchar(11)  null comment '手机号码'
)
    comment '这是一张存储用户信息的表';
插入测试数据。
insert into mybatis.t_user (id, name, password, t_realname, gender, tel)
values  (21, 'Hayashi Seiko', 'cJDLi6lTb2', 'asdasdsad', 'F', 'YbEzm4aRVT'),
        (22, 'Joanne Hill', 'l5TTQEbCR7', 'Joanne Hill', 'F', 'tBSJCzsiju'),
        (23, 'Ku Siu Wai', 'VPGbbUWOwl', 'Ku Siu Wai', 'F', 'XZqW7HmEpf'),
        (24, 'Leslie Wright', 'gaqnfwbloS', 'Leslie Wright', 'F', '2hEpoKYCR8'),
        (25, 'Hashimoto Ayano', 'YpHCZBLvn6', 'Hashimoto Ayano', 'F', '5LLVDVuUEd'),
        (26, 'Taniguchi Nanami', 'WDFWZfvKqS', 'Taniguchi Nanami', 'M', 'IEkrs76WQv'),
        (27, 'test', '123qwe', '真实姓名', 'W', '13411111111'),
        (44, 'reklawjr', 'password', '真实名称', 'W', '13412341234'),
        (45, 'reklawjr', 'password', '真实名称', 'W', '13412341234'),
        (46, 'reklawjr', 'password', '真实名称', 'W', '13412341234');
7.1 引入依赖
使用 MyBatis 操作数据库需要引入 MyBatis 和 各大数据库厂商对 JDBC 接口的实现,其他的什么事务他它们会自己依赖。
<dependency>
    <groupId>org.mybatis.spring.boot</groupId>
    <artifactId>mybatis-spring-boot-starter</artifactId>
    <version>3.0.3</version>
</dependency>
<dependency>
    <groupId>com.mysql</groupId>
    <artifactId>mysql-connector-j</artifactId>
    <scope>runtime</scope>
</dependency>
7.2 编写 POJO 类
编写数据库查询结果集映射类 com.raingray.pojo.UserVO。
package com.raingray.pojo;

import java.util.Objects;

public class UserVO {
    private Integer id;
    private String name;
    private String password;
    private String realName;
    private String gender;
    private String phoneNumber;

    public UserVO() {
    }

    public UserVO(Integer id, String name, String password, String realName, String gender, String phoneNumber) {
        this.id = id;
        this.name = name;
        this.password = password;
        this.realName = realName;
        this.gender = gender;
        this.phoneNumber = phoneNumber;
    }

    public Integer getId() {
        return id;
    }

    public void setId(Integer id) {
        this.id = id;
    }

    public String getName() {
        return name;
    }

    public void setName(String name) {
        this.name = name;
    }

    public String getPassword() {
        return password;
    }

    public void setPassword(String password) {
        this.password = password;
    }

    public String getRealName() {
        return realName;
    }

    public void setRealName(String realName) {
        this.realName = realName;
    }

    public String getGender() {
        return gender;
    }

    public void setGender(String gender) {
        this.gender = gender;
    }

    public String getPhoneNumber() {
        return phoneNumber;
    }

    public void setPhoneNumber(String phoneNumber) {
        this.phoneNumber = phoneNumber;
    }

    @Override
    public boolean equals(Object o) {
        if (this == o) return true;
        if (o == null || getClass() != o.getClass()) return false;
        UserVO user = (UserVO) o;
        return Objects.equals(id, user.id) && Objects.equals(name, user.name) && Objects.equals(password, user.password) && Objects.equals(realName, user.realName) && Objects.equals(gender, user.gender) && Objects.equals(phoneNumber, user.phoneNumber);
    }

    @Override
    public int hashCode() {
        return Objects.hash(id, name, password, realName, gender, phoneNumber);
    }

    @Override
    public String toString() {
        return "User{" +
                "id=" + id +
                ", name='" + name + '\'' +
                ", password='" + password + '\'' +
                ", realName='" + realName + '\'' +
                ", gender='" + gender + '\'' +
                ", phoneNumber='" + phoneNumber + '\'' +
                '}';
    }
}
也可以使用 Lombok 的 @Data 注解编译时生成 getter、setter、equals、hashCode、toString 方法。
package com.raingray.pojo;


import lombok.Data;

@Data
public class UserVO {
    private Integer id;
    private String name;
    private String password;
    private String realName;
    private String gender;
    private String phoneNumber;
}
7.3 编写 Mapper
创建 com.raingray.mapper.UserMapper 接口。
package com.raingray.mapper;

import com.raingray.pojo.UserVO;
import org.apache.ibatis.annotations.Param;

public interface UserMapper {
    /**
     * 根据用户 ID 查询用户所有信息
     * @param id 用户 ID 值。其中 @Param 是 MyBatis 注解用于指定 SQL 参数名称。
     * @return 返回用户对象
     */
    UserVO getUserById(@Param("id") Integer id);
}
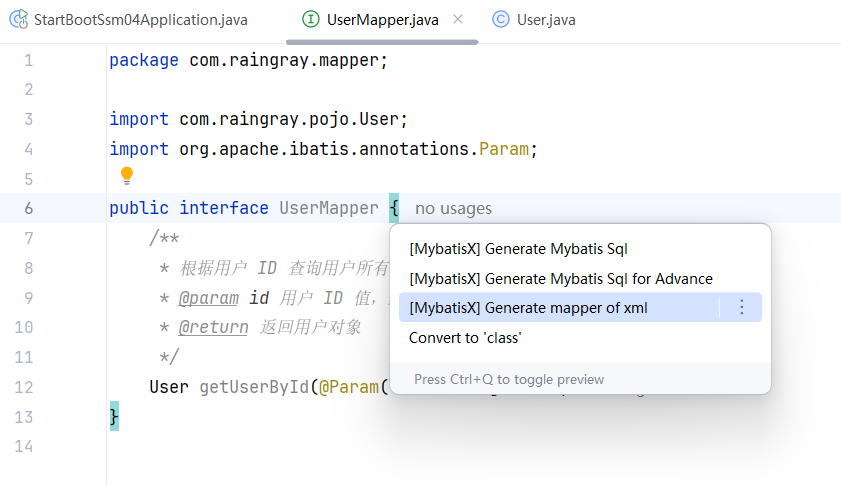
可以使用 IDEA 第三方插件 MyBatisX 来帮助我们写重复性的内容。在接口名上 Alt + Insert 选择生成 Mapper 接口对应 XML,会提示保存位置,这里我选择保存到 classpath:/mapper 中。
<?xml version="1.0" encoding="UTF-8" ?>
<!DOCTYPE mapper PUBLIC "-//mybatis.org//DTD Mapper 3.0//EN" "http://mybatis.org/dtd/mybatis-3-mapper.dtd" >
<mapper namespace="com.raingray.mapper.UserMapper">
</mapper>
接着在方法上 Alt + Insert 快速编写 SQL 语句。
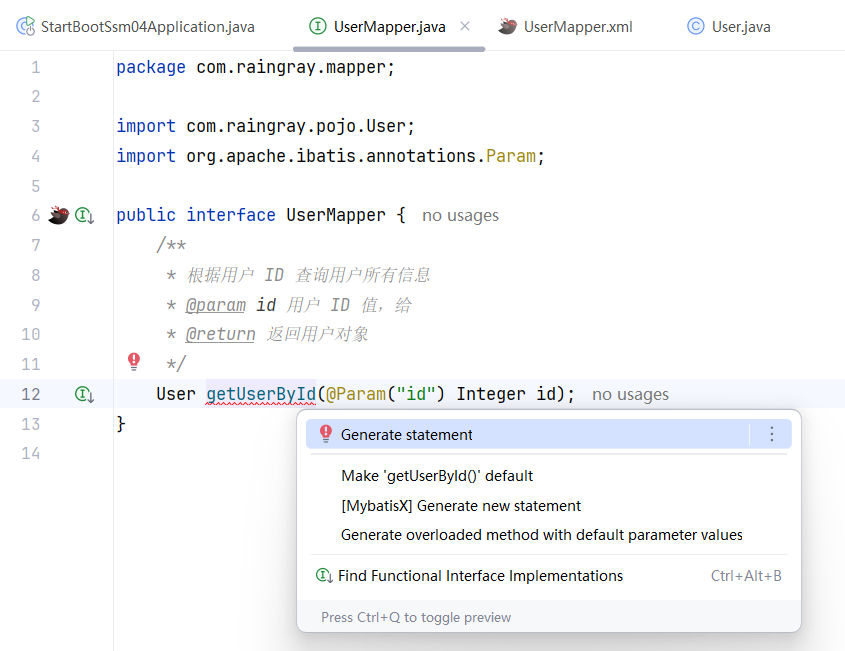
会为你自动生成对应 SQL 标签,你只需要写 SQL 就好。
<?xml version="1.0" encoding="UTF-8" ?>
<!DOCTYPE mapper PUBLIC "-//mybatis.org//DTD Mapper 3.0//EN" "http://mybatis.org/dtd/mybatis-3-mapper.dtd" >
<mapper namespace="com.raingray.mapper.UserMapper">
    <select id="getUserById" resultType="com.raingray.pojo.UserVO"></select>
</mapper>
最终编写如下 SQL 查询,结果集不能自动映射的手动处理映射关系。
<?xml version="1.0" encoding="UTF-8" ?>
<!DOCTYPE mapper PUBLIC "-//mybatis.org//DTD Mapper 3.0//EN" "http://mybatis.org/dtd/mybatis-3-mapper.dtd" >
<mapper namespace="com.raingray.mapper.UserMapper">
    <resultMap id="user" type="com.raingray.pojo.UserVO">
        <id property="id" column="id"/>
        <result column="tel" property="phoneNumber"/>
        <result column="t_realname" property="realName"/>
    </resultMap>
    <select id="getUserById" resultType="com.raingray.pojo.UserVO" resultMap="user">
        SELECT
            id, name, password, t_realname, gender, tel
        FROM
            t_user
        WHERE
            id = #{id}
    </select>
</mapper>
7.4 注册 Mapper 与配置数据源
接下来要扫描 Mapper 接口创建动态代理类对象和指定 SQL 语句 XML 配置文件,这样才能让 Mapper 实现类知道 XML 在哪里从而找到里面对应的 SQL 去执行。
做配置难免要分析 MyBatis 的 mybatis-spring-boot-starter 中自动配置类怎么做的配置,当你引入 mybatis-spring-boot-starter 会导入以下依赖:
org.springframework.boot:spring-boot-starter-jdbc:3.3.3
- com.zaxxer:HikariCP:5.1.0,数据源
- org.springframework:spring-jdbc:6.1.12,事务管理器
- org.mybatis.spring.boot:mybatis-spring-boot-autoconfigure:3.0.3,MyBatis 自动配置包
- org.mybatis:mybatis:3.5.14,MyBaits
- org.mybatis:mybatis-spring:3.0.3,MyBatis 和 Spring 整合包
mybatis-spring-boot-autoconfigure.jar 自动配置包中 classpath:/META-INF/spring/org.springframework.boot.autoconfigure.AutoConfiguration.imports 文件就是要导入的自动配置类。
org.mybatis.spring.boot.autoconfigure.MybatisLanguageDriverAutoConfiguration
org.mybatis.spring.boot.autoconfigure.MybatisAutoConfiguration
最主要的配置类是 org.mybatis.spring.boot.autoconfigure.MybatisAutoConfiguration,类上有不少注解。
@ConditionalOnClass({SqlSessionFactory.class, SqlSessionFactoryBean.class})
@ConditionalOnSingleCandidate(DataSource.class)
@EnableConfigurationProperties({MybatisProperties.class})
@AutoConfigureAfter({DataSourceAutoConfiguration.class, MybatisLanguageDriverAutoConfiguration.class})
public class MybatisAutoConfiguration implements InitializingBean {
    ......
}
首先用 @ConditionalOnClass({SqlSessionFactory.class, SqlSessionFactoryBean.class}) 检查 class-path 有没有 SqlSessionFactory 和 SqlSessionFactoryBean,这两个类是 MyBatis 核心类,就是用来判断你有没有引入依赖。没有引入就不执行自动配置。
@ConditionalOnSingleCandidate(DataSource.class) 则是看 IoC 中有没有 DataSource 接口的实现类对象,有的话就不执行,说明你自己有配置数据源,无需 Mybatis 自动配置。
@EnableConfigurationProperties({MybatisProperties.class}) 是绑定 MybatisProperties 属性配置类,和属性配置文件匹配完后,把属性配置对象放到 IoC 容器管理。
@AutoConfigureAfter({DataSourceAutoConfiguration.class, MybatisLanguageDriverAutoConfiguration.class}),是当前配置类执行完成后再运行执行配置类。
根据自动配置类绑定的 org.mybatis.spring.boot.autoconfigure.MybatisProperties 和 org.springframework.boot.autoconfigure.jdbc.DataSourceProperties 属性配置类来看可以在配置文件中配置以下内容。
spring:
  # 配置数据源
  datasource:
    url: jdbc:mysql://localhost:3306/mybatis
    username: root
    password:
    # 如果不填会执行 DataSourceProperties#determineDriverClassName 方法,根据 url 中关键字去枚举类进行匹配对应名称。
    # driver-class-name: com.mysql.cj.jdbc.Driver

mybatis:
  # 配置 MyBatis 要扫描 Mapper XML 配置文件,是 String 数组所以可以配置多个
  mapper-locations: classpath:/mapper/*.xml
  # 配置 MyBatis 主配置文件路径
  # config-location: classpath:mybatis-config.xml
7.5 测试数据联通情况
这里为了简单省事,就不写 Service 层,直接 Controller 调 Dao。
package com.raingray.controller;

import com.raingray.pojo.UserVO;
import com.raingray.mapper.UserMapper;
import org.slf4j.Logger;
import org.slf4j.LoggerFactory;
import org.springframework.beans.factory.annotation.Autowired;
import org.springframework.web.bind.annotation.GetMapping;
import org.springframework.web.bind.annotation.PathVariable;
import org.springframework.web.bind.annotation.RestController;

@RestController
public class IndexController {
    private static final Logger log = LoggerFactory.getLogger(IndexController.class);

    @Autowired
    private UserMapper user;

    @GetMapping("/user/{id}")
    public UserVO index(@PathVariable("id") Integer id) {
        UserVO userObj = user.getUserById(id);
        log.info(userObj.toString());
        return userObj;
    }
}
访问 http://localhost/user/46 成功获取数据库数据。
GET /user/46 HTTP/1.1
Host: localhost
User-Agent: Mozilla/5.0 (Windows NT 10.0; Win64; x64) AppleWebKit/537.36 (KHTML, like Gecko) Chrome/127.0.6533.100 Safari/537.36
Accept-Encoding: gzip, deflate, br
Accept: text/html,application/xhtml+xml,application/xml;q=0.9,image/avif,image/webp,image/apng,*/*;q=0.8
Connection: keep-alive


HTTP/1.1 200
Content-Type: application/json
Date: Fri, 13 Sep 2024 02:09:40 GMT
Keep-Alive: timeout=60
Connection: keep-alive
Content-Length: 116

{"id":46,"name":"reklawjr","password":"password","realName":"真实名称","gender":"W","phoneNumber":"13412341234"}
访问控制与过滤🔨
RBAC 模型,基于角色访问控制,需要用到用户表、角色表和权限表。
Shiro
Spring Security
部署🔨
学透Spring:从入门到项目实战,第五章
使用 spring boot maven 插件打成 jar 包运行,使用 java -jar 运行。
<project>
    ......
    <build>
        <plugins>
            <plugin>
                <groupId>org.springframework.boot</groupId>
                <artifactId>spring-boot-maven-plugin</artifactId>
            </plugin>
        </plugins>
    </build>

</project>
AOT 和 JIT
Docker 部署应用。
最近更新:
发布时间: